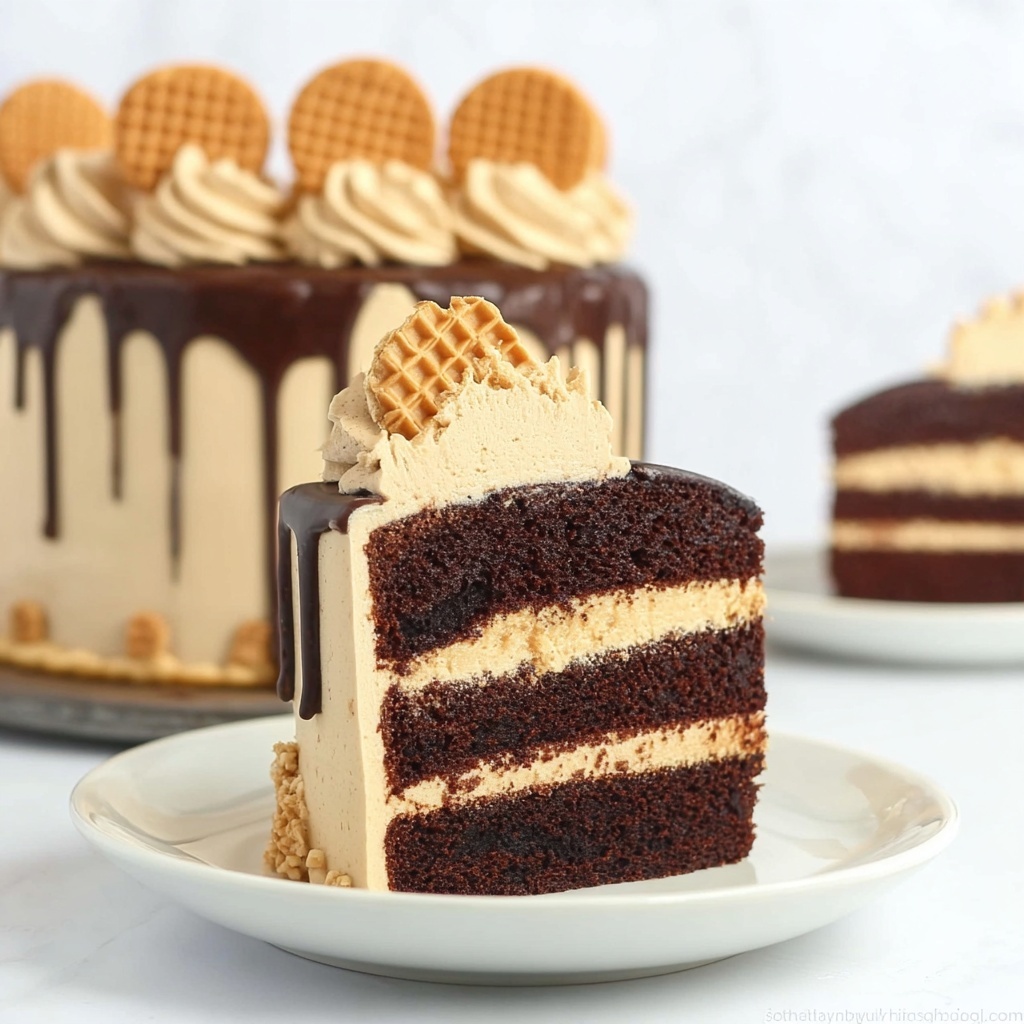
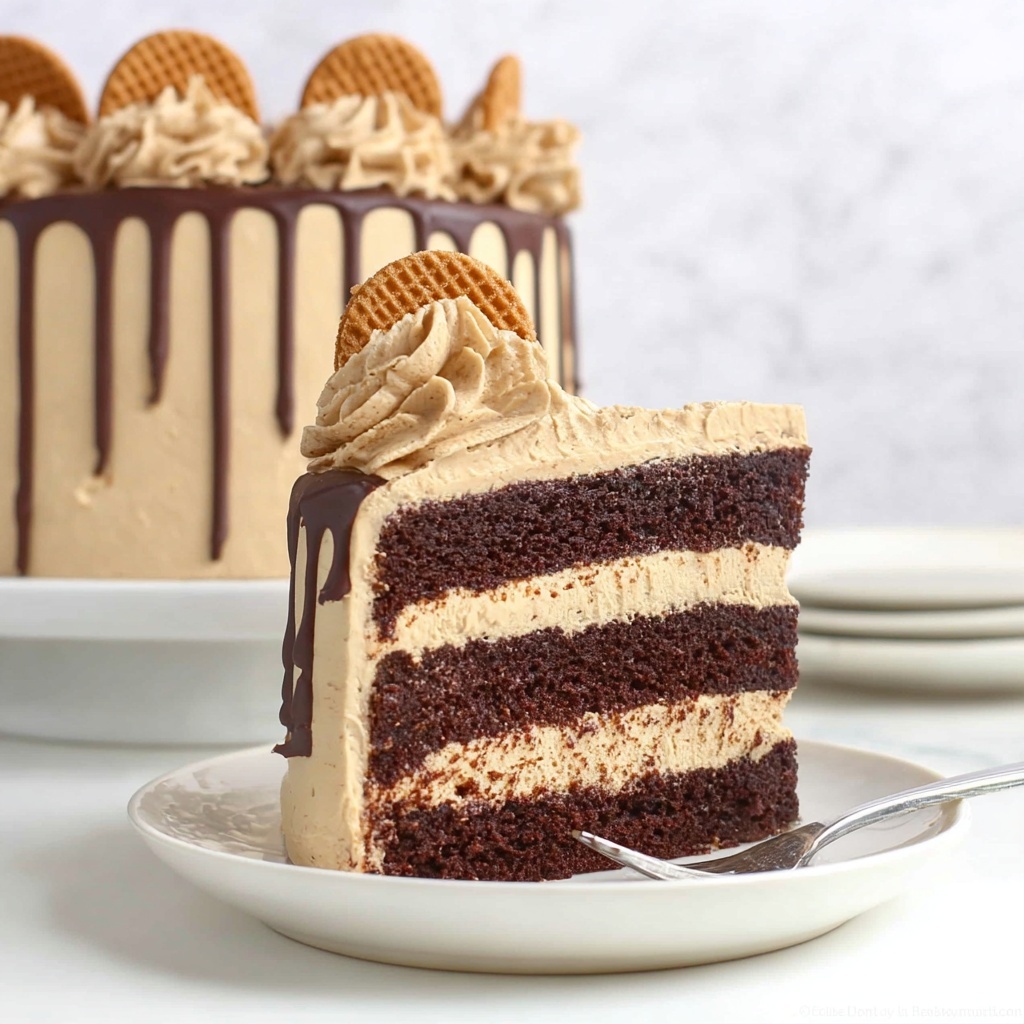
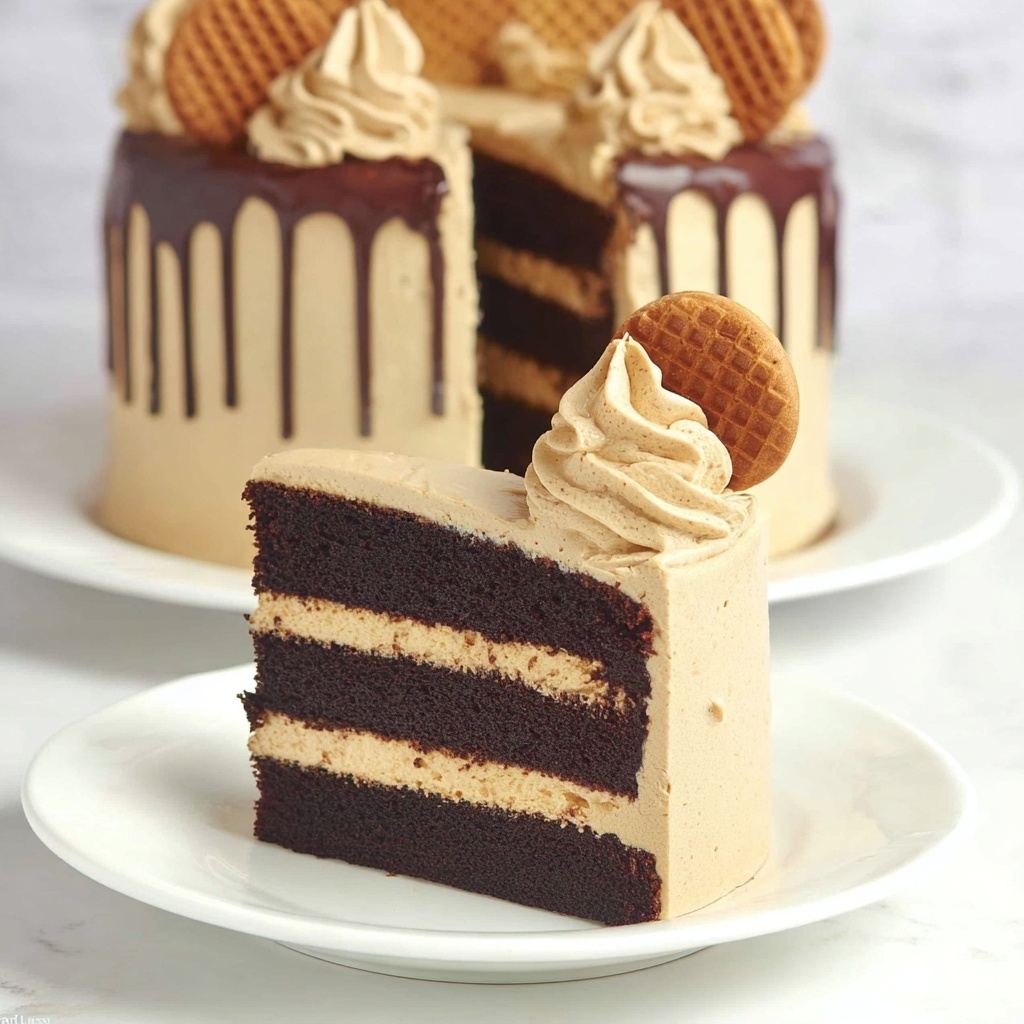
If you have a sweet tooth that’s begging for something rich, indulgent, and full of nostalgic peanut butter flavor, then you are going to adore this Nutter Butter Chocolate Peanut Butter Cake Recipe. It’s a crowd-pleaser that layers luscious chocolate cake with silky peanut butter frosting, studded with those iconic Mini Nutter Butter cookies and finished off with a dreamy chocolate ganache. This cake isn’t just a treat; it’s a celebration of textures and flavors that come together perfectly. Get ready to dive into a dessert that feels like a warm hug from your favorite childhood snack reinvented into a show-stopping cake.
Ingredients You’ll Need
These ingredients may seem straightforward, but each one plays a crucial role in building the texture, flavor, and irresistible appearance of your cake. From the moist chocolate cake base to the silky peanut butter frosting, every item here works in harmony to create something truly special.
- 2 boxes milk chocolate cake mix: Provides the moist and chocolaty cake foundation that makes slicing and serving a breeze.
- 2 1/2 cups whole milk: Adds moisture and richness to the cake, keeping it tender and soft.
- 2 cups unsalted sweet cream butter (softened): Critical for creating a smooth, creamy peanut butter frosting that spreads beautifully.
- 6 large eggs: Enhance the cake’s structure and fluffiness for perfect crumb.
- 3 cups powdered sugar: Sweetens and stabilizes the frosting, giving it that melt-in-your-mouth feel.
- 4 tablespoons heavy whipping cream: Adds extra silkiness and richness to the frosting mixture.
- 1/2 cup peanut butter: Brings that unmistakable nutty flavor and creamy texture that defines this cake.
- 1 teaspoon vanilla extract: Enhances all the flavors, lending a warm, aromatic note.
- 1 container Mini Nutter Butter Cookies: Adds delightful crunch and peanut butter goodness inside and on top of the cake.
- 1 cup semi-sweet chocolate chips: Used to create a luscious chocolate ganache for a glossy, rich finish.
- 1/2 cup heavy whipping cream: Helps in melting the chocolate chips smoothly for the perfect ganache drip.
How to Make Nutter Butter Chocolate Peanut Butter Cake Recipe
Step 1: Prepare the Chocolate Cake Batter
Start by preheating your oven and greasing your cake pans. In a large mixing bowl, combine the two boxes of milk chocolate cake mix, whole milk, and eggs. Whisk these ingredients together just until they’re combined—be careful not to overmix, or your cake might turn out dense. Pour the batter evenly into two or three pans depending on the layers you want. Pop the pans into the oven and bake according to the package instructions or until a toothpick inserted comes out clean. This step is crucial because the perfectly baked chocolate layers are the base of all the magic coming next.
Step 2: Whip Up the Peanut Butter Frosting
While your cakes cool, it’s time to focus on the frosting, which is the heart of this recipe. Beat together the softened butter and peanut butter until super smooth and creamy with no lumps. Gradually add powdered sugar, alternating with heavy whipping cream, and finally vanilla extract to create a luscious, fluffy peanut butter frosting. Taste it—you’ll want to savor this moment because this frosting is rich, perfectly sweet, and utterly addictive.
Step 3: Assemble the Cake Layers
Once the cake layers have cooled completely (patience is key here to avoid frosting melting and sliding!), spread a generous layer of peanut butter frosting between each cake layer. Don’t be shy; the more frosting the better! Now sprinkle some Mini Nutter Butter cookies crumbs between layers for that delightful surprise crunch. Repeat until all layers are stacked and then smooth a final coat of frosting around the entire cake. It’s already looking dreamy, isn’t it?
Step 4: Create the Chocolate Ganache
In a small saucepan over low heat, warm the half cup of heavy cream until just simmering. Remove from heat and pour over the semi-sweet chocolate chips in a heatproof bowl. Let it sit for a minute, then stir until silky and smooth. Allow the ganache to cool slightly so it thickens just enough to drip beautifully without running off completely. Pour this luscious ganache over the top of the cake and let it cascade down the edges for that wow-worthy finish.
Step 5: Decorate with Mini Nutter Butter Cookies
Top your masterpiece with whole Mini Nutter Butter cookies as a charming garnish that hints at what’s inside. Press them gently into the ganache before it sets. This final touch not only looks fabulous but also adds extra texture and peanut butter yum to every slice.
How to Serve Nutter Butter Chocolate Peanut Butter Cake Recipe
Garnishes
When serving, don’t hesitate to add extra Mini Nutter Butter cookies on the side or chopped peanuts for crunch. A light dusting of cocoa powder or a drizzle of melted peanut butter over each plate adds an elegant yet playful presentation that will impress your guests.
Side Dishes
This cake pairs beautifully with a scoop of vanilla bean ice cream or a simple dollop of whipped cream. For a refreshing contrast, serve alongside fresh berries or a crisp glass of cold milk, both of which balance the richness perfectly.
Creative Ways to Present
Consider serving individual slices in clear dessert cups layered with crushed Mini Nutter Butters and frosting for a fun twist. Or cut the cake into bite-sized squares and drizzle them with ganache for stunning cupcake-style treats that everyone can enjoy with their hands.
Make Ahead and Storage
Storing Leftovers
Wrap leftover cake tightly with plastic wrap or keep it in an airtight container refrigerated for up to 4 days. This keeps the frosting fresh and the cake moist. Just remember to bring it to room temperature before serving to enjoy the full flavor and softness.
Freezing
You can freeze this cake, but it’s best to freeze unfrosted layers separately, wrapped well in plastic wrap and foil, for up to three months. Thaw layers overnight in the fridge and then frost and assemble right before serving to keep that peanut butter frosting vibrant and fresh.
Reheating
Since this is a rich frosted cake, reheating is not usually necessary, but if you prefer a warmer slice, simply let the piece sit at room temperature for about 30 minutes. Avoid microwaving as it can alter texture and melt the frosting unevenly.
FAQs
Can I use natural peanut butter in this Nutter Butter Chocolate Peanut Butter Cake Recipe?
You can, but natural peanut butter tends to be less sweet and more oily, which might affect the frosting consistency. If you go this route, you may want to add a bit of powdered sugar to maintain that perfect sweetness and texture balance.
What can I substitute for Mini Nutter Butter cookies if I can’t find them?
If Mini Nutter Butters are elusive, crushed peanut butter sandwich cookies or even finely chopped peanut brittle can be excellent substitutes that provide similar flavor and crunch.
Is this cake suitable for freezing after it’s fully assembled?
Freezing a fully assembled cake with frosting and ganache can sometimes cause texture changes, especially in the frosting. It’s generally better to freeze the layers separately and assemble fresh when ready to serve.
Can I make this recipe gluten-free?
To make it gluten-free, you’ll need to use gluten-free cake mixes and ensure your Mini Nutter Butter cookies have gluten-free alternatives, which might require a bit of creative searching but is certainly doable!
How far in advance can I prepare this cake before serving?
You can prepare and assemble this cake up to two days in advance. Keep it refrigerated and covered to preserve freshness. Bringing it to room temperature before serving will bring out the best flavor and texture.
Final Thoughts
This Nutter Butter Chocolate Peanut Butter Cake Recipe truly feels like a delicious nod to childhood memories with a grown-up twist. It’s rich, creamy, and wonderfully nostalgic, making it a superb centerpiece for any celebration or just a decadent weekend treat. I can’t wait for you to try this recipe and experience how the flavors and textures harmonize into something unforgettable. Get ready to wow your friends, family, and yourself—you’re about to make a cake that everyone will be talking about!