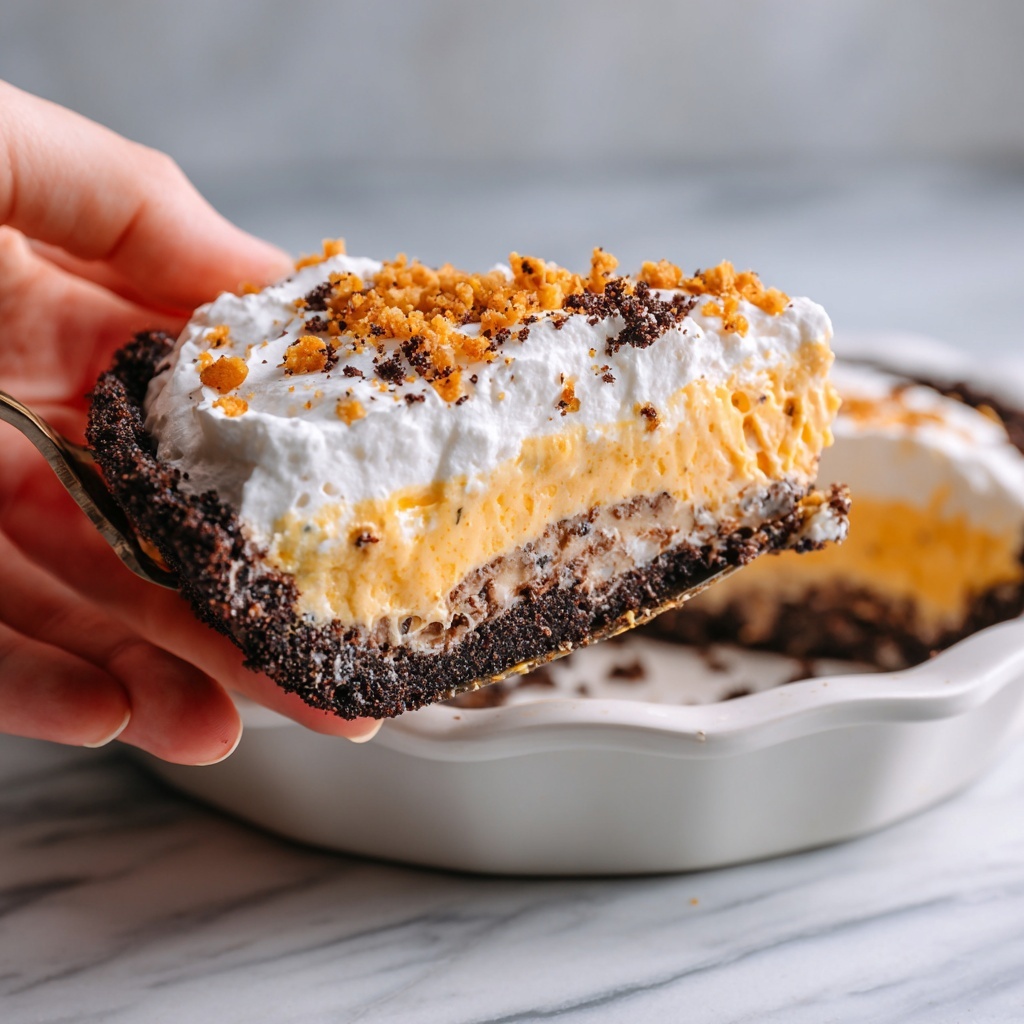
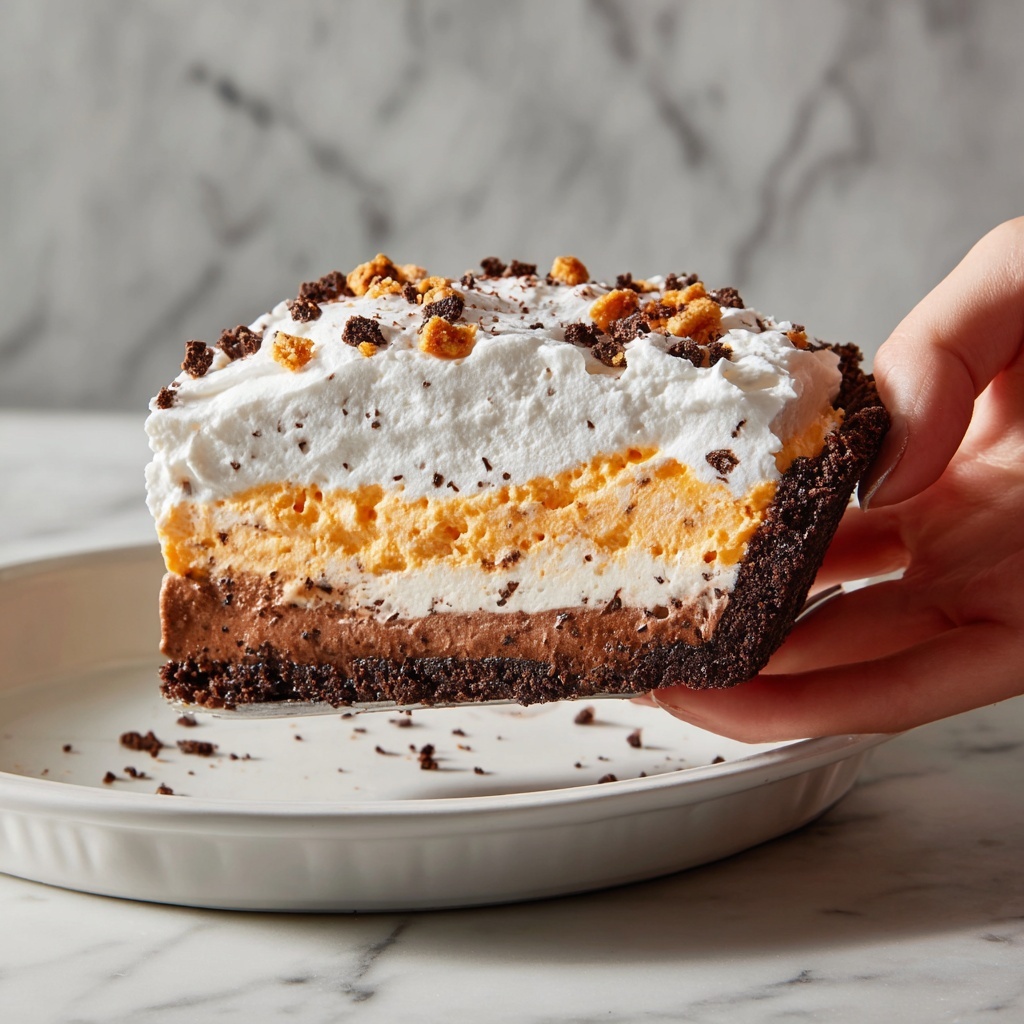
If you have a sweet tooth that craves something rich, creamy, and packed with peanut buttery, chocolatey crunch, then this Butterfinger Pie Recipe is going to be your new obsession. Combining the irresistible texture of crushed Oreo cookies with the smoothness of cream cheese and peanut butter, topped off with chunks of Butterfinger candy bars and fluffy whipped cream, this no-bake dessert is perfect when you want to impress without sweating over the oven. It’s playful, nostalgic, and so satisfyingly decadent that one slice simply won’t be enough.

Ingredients You’ll Need
Gathering the right ingredients for this Butterfinger Pie Recipe is key, but don’t worry—they are straightforward and magic-makers each in their own way. From the creamy elements to the crunchy accents, every component shines through to create that perfect balance of flavor and texture you’ll adore.
- 30 Oreo Cookies: These form the crunchy, chocolatey base that adds a wonderful texture and slight bitterness to balance the sweetness.
- 7 Tablespoons unsalted butter (melted): Helps bind the Oreo crust and adds a rich, buttery flavor.
- 8 ounces cream cheese (softened): Gives the filling its smooth and tangy creaminess, working beautifully with peanut butter.
- ½ cup creamy peanut butter: Adds that luscious peanut flavor essential to the pie’s character.
- 1/3 cup powdered sugar: Sweetens the peanut butter and cream cheese mixture just right.
- 12 ounces Butterfinger candy bars: The star ingredient, chopped to add delightful crunch and a classic candy bar taste.
- 8 ounces Cool Whip (thawed): Lightens the filling, creating a fluffy, airy texture.
- 1 cup Heavy Whipping Cream: Whipped to soft peaks for the topping, lending luxurious creaminess.
- 1 teaspoon vanilla extract: Enhances all the flavors in the whipped cream for a rich and aromatic finish.
- 2 Tablespoons powdered sugar: Sweetens the whipped cream topping for a perfect balance.
How to Make Butterfinger Pie Recipe
Step 1: Prepare the Oreo Crust
Start by finely crushing the Oreo cookies until they resemble coarse crumbs. Then, stir in the melted unsalted butter to bind those crumbs together. Press this mixture firmly into the bottom of a 9-inch pie pan to create a solid, chocolatey crust that will hold all the creamy filling you’re about to add. This base is what gives the pie its sturdy foundation and decadent chocolate edge—trust me, don’t skip this step!
Step 2: Make the Peanut Butter Cream Filling
In a large mixing bowl, beat together the softened cream cheese, creamy peanut butter, and powdered sugar until it’s smooth and well incorporated. Then gently fold in the Cool Whip to lighten the mixture without deflating it. This combination is pure silky heaven, with the peanut butter and cream cheese providing sweetness and richness, while the Cool Whip gives it that airy fluff that keeps things from feeling too heavy.
Step 3: Add the Butterfinger Chunks
Chop the Butterfinger candy bars into small chunks, then gently fold them into your peanut butter cream filling. The crunch of these bits throughout the pie creates little pockets of candy bar goodness that perfectly balance the creamy filling. After mixing, spread this luscious filling evenly over your Oreo crust and smooth the top with a spatula.
Step 4: Whip and Add the Creamy Topping
In a chilled bowl, whip the heavy cream together with the vanilla extract and powdered sugar until soft peaks form. This whipped cream layer crowns the pie with a light, fluffy texture and subtle sweetness that complements the candy bars and peanut butter layers. Spread the whipped cream evenly over the filling, making sure every slice will get a creamy, dreamy topping.
Step 5: Chill and Set
Refrigerate the pie for at least 3 to 4 hours, or overnight if you can wait that long. This chilling step is crucial for the pie to fully set, allowing the flavors to meld and the textures to firm up just right. When it’s time to serve, run a knife around the edge to loosen and slice into generous pieces.
How to Serve Butterfinger Pie Recipe
Garnishes
For an extra special presentation and taste boost, sprinkle some finely crushed Butterfinger bars or Oreo crumbs on top of the whipped cream. You can also drizzle a little melted chocolate or peanut butter sauce for added flair. A few chocolate shavings or even a dollop of extra Cool Whip never hurt anyone and add that perfect finishing touch to this already spectacular dessert.
Side Dishes
This pie is rich enough to stand on its own, but if you want to round out your dessert plate, fresh berries or a bright fruit salad provide a lovely contrast. A cup of hot coffee or a glass of cold milk pairs beautifully, balancing the peanut butter sweetness with their own comforting notes.
Creative Ways to Present
Looking to wow guests? Serve individual portions in clear dessert cups layered with cookie crumbs, filling, and whipped cream for a charming mini Butterfinger pie parfait. Alternatively, garnish slices with edible gold leaf or crushed nuts for a fancy twist, making this pie a showstopper at any dinner or celebration.
Make Ahead and Storage
Storing Leftovers
After enjoying a slice or two, store any leftovers in an airtight container in the refrigerator. The Butterfinger Pie Recipe keeps well for up to 3 days, letting the flavors meld together even more, though it’s unlikely to last that long once people taste it!
Freezing
If you want to keep your pie for longer, freezing is a great option. Wrap the pie tightly with plastic wrap and then foil to prevent freezer burn. Frozen Butterfinger Pie can last up to 1 month. When ready to eat, thaw it overnight in the fridge to preserve texture and flavor.
Reheating
This pie is best served cold, so reheating isn’t necessary. Just remember to slice it after chilling to maintain that perfect creamy and crunchy consistency that makes this Butterfinger Pie Recipe such a delightful treat.
FAQs
Can I use peanut butter powder instead of creamy peanut butter?
While peanut butter powder can offer a lighter peanut flavor with less fat, the creamy peanut butter is important in this pie to achieve the smooth texture and richness. Substituting may change the texture and taste, so if you want the classic outcome, stick with creamy peanut butter.
Is it possible to make this pie nut-free?
Since peanut butter is a core ingredient defining this pie’s flavor, making it truly nut-free would require a different approach, like substituting with a seed butter. However, this will alter the traditional taste — just be sure to use allergy-safe ingredients if needed.
Can I use homemade whipped cream instead of Cool Whip?
Absolutely! Homemade whipped cream can replace Cool Whip for a fresher, less processed option. Just whip heavy cream with a bit of powdered sugar and vanilla until soft peaks form and fold it gently into the filling.
How do I chop the Butterfinger bars without making a mess?
Chilling the Butterfinger bars in the fridge for about 30 minutes before chopping makes them firmer and easier to cut into neat chunks. Using a sharp knife and a steady hand will minimize crumbling and keep your workspace cleaner.
Can I double this Butterfinger Pie Recipe for a larger gathering?
Definitely! You can easily double the ingredients and prepare two pies or use a larger pan. Just keep proportions the same and make sure both pies chill properly to set before serving.
Final Thoughts
This Butterfinger Pie Recipe has a way of bringing smiles and satisfied sighs to every table. It’s the kind of dessert that feels comforting and a little indulgent all at once, perfect for any occasion where you want to treat yourself or loved ones. If you’re looking for a crowd-pleasing sweet that blends creamy, crunchy, and chocolate-peanutty flavors flawlessly, it’s time to dive into this delicious pie. Go ahead and make one, then watch how quickly it disappears!
Print
Butterfinger Pie Recipe
- Prep Time: 20 minutes
- Cook Time: 0 minutes
- Total Time: 4 hours 20 minutes (including chilling time)
- Yield: 8 slices
- Category: Dessert
- Method: No-Cook
- Cuisine: American
Description
This Butterfinger Pie is a no-bake, creamy delight combining the crunch of Oreo cookies, the richness of peanut butter and cream cheese, and the irresistible crunch of Butterfinger candy bars. Perfect for a quick dessert that requires minimal prep with maximum flavor, it’s an indulgent treat that serves 8 slices.
Ingredients
Crust
- 30 Oreo Cookies
- 7 Tablespoons unsalted butter (melted)
Filling
- 8 ounces cream cheese (softened to room temperature)
- ½ cup creamy peanut butter (any brand)
- 1/3 cup powdered sugar
- 12 ounces Butterfinger candy bars, chopped
- 8 ounces Cool Whip (thawed)
Topping
- 1 cup Heavy Whipping Cream
- 1 teaspoon vanilla extract
- 2 Tablespoons powdered sugar
Instructions
- Prepare the crust: Crush the Oreo cookies finely and combine them with the melted unsalted butter. Press this mixture firmly into the bottom of a 9-inch pie pan to form an even crust. Refrigerate while preparing the filling.
- Make the filling: In a large bowl, beat the softened cream cheese until smooth. Add the creamy peanut butter and 1/3 cup powdered sugar, mixing until well combined. Fold in the chopped Butterfinger candy bars and the thawed Cool Whip gently to preserve the airy texture. Spread this filling evenly over the chilled Oreo crust.
- Prepare and add the topping: In a separate bowl, whip the heavy whipping cream with vanilla extract and 2 tablespoons powdered sugar until stiff peaks form. Dollop or spread the whipped cream topping over the filling layer. Chill the pie in the refrigerator for at least 4 hours, preferably overnight, to let it set before serving.
Notes
- You can substitute the peanut butter with almond butter for a slightly different flavor.
- Ensure the cream cheese is fully softened for a smooth filling.
- For easier crust pressing, use the back of a glass to compact the Oreo mixture evenly.
- If Butterfinger bars are unavailable, chopped peanut butter cups make a good alternative.
- This pie should be stored in the refrigerator and consumed within 3 days for best freshness.

