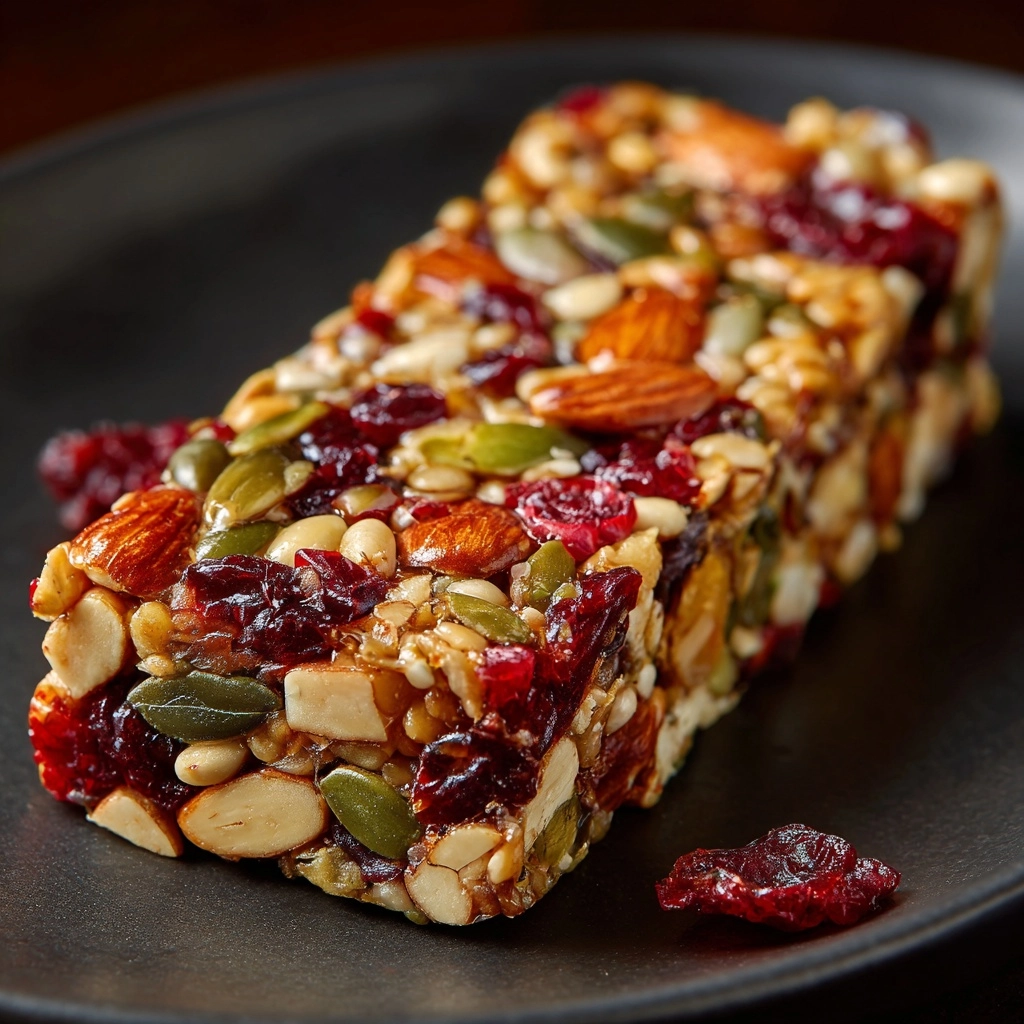
If you’re always craving a nourishing, portable snack that doesn’t skimp on flavor or health benefits, you’re absolutely going to fall in love with these Homemade Energy Bars Packed with Strength and Energy. They’re no-bake, filled with wholesome ingredients like oats, nuts, seeds, and dried fruit, and balanced with just enough sweetness and a little dark chocolate to keep cravings at bay. Whether you’re prepping for a busy week, fueling an afternoon hike, or just need an energizing pick-me-up, these bars check every box for taste, convenience, and nutrition.
Ingredients You’ll Need
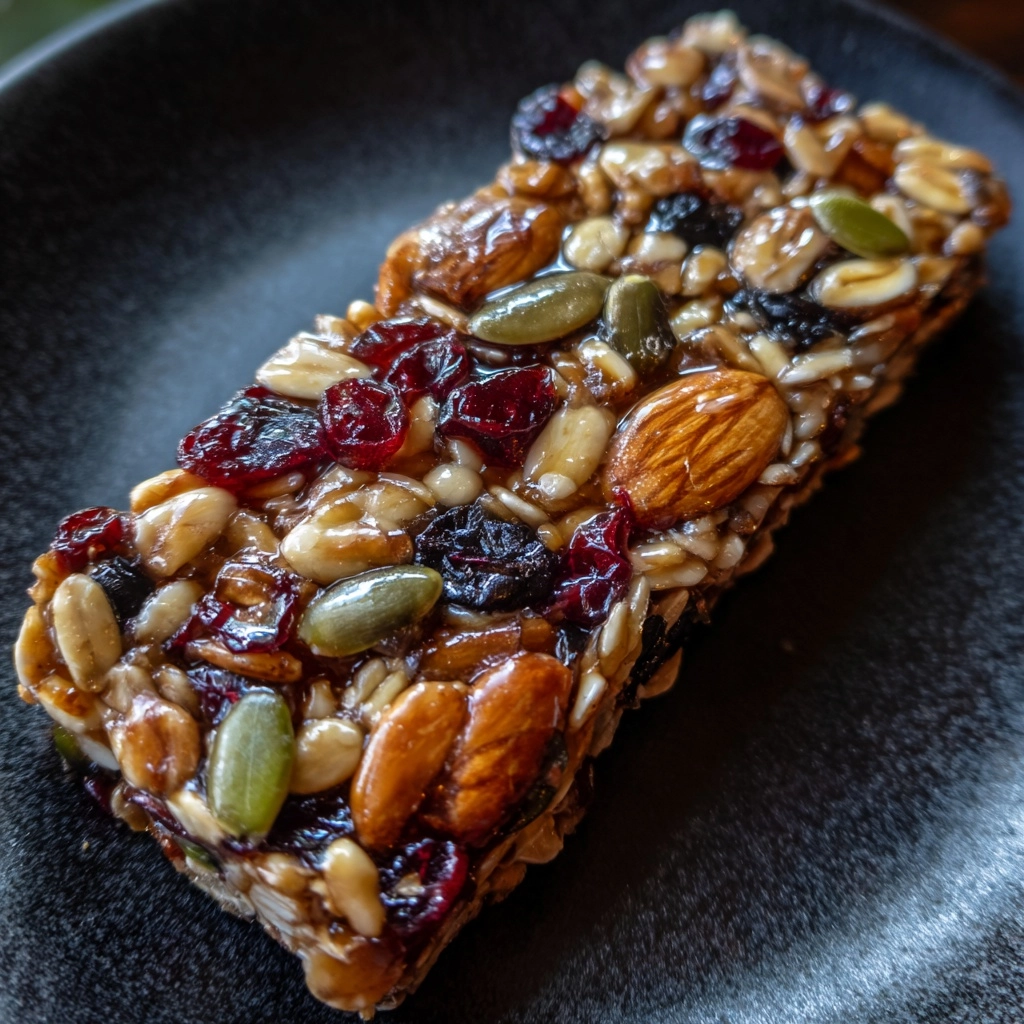
What I adore most about this recipe is how simple but purposeful every ingredient is. Each component contributes something special: texture, natural sweetness, satisfying chew, or a pop of color. Here’s how it all comes together:
- Old-fashioned rolled oats: Add chewy texture and satisfying fiber, the perfect foundation for sturdy bars.
- Raw almonds (chopped): Provide a delightful crunch and nutty flavor that keeps you coming back for more.
- Medjool dates (pitted): The natural binder; they sweeten and create the sticky base that holds everything together.
- Dried cranberries: Offer a tart pop of color and a lovely tang that contrasts beautifully with the sweet dates.
- Natural peanut butter: Adds rich, creamy flavor, healthy fats, and irresistible “stickiness.”
- Honey or maple syrup: Sweetens naturally and gives the bars a subtle shine and softness.
- Chia seeds: Bring a nutritional boost with omega-3s, plus a tiny bit of crunch.
- Ground flaxseed: Delivers extra fiber and helps the bars feel hearty and nourishing.
- Dark chocolate chips: The ultimate treat-worthy touch that makes each bite a little more exciting.
- Vanilla extract: Rounds out the flavors with a gentle warmth that ties the ingredients together.
- Cinnamon: Provides a subtle spice and a cozy aroma you’ll notice as soon as you take a bite.
- Sea salt: Lifts and balances the sweetness, rounding out every flavor in the bar.
How to Make Homemade Energy Bars Packed with Strength and Energy
Step 1: Prepare Your Pan
Start by lining an 8×8-inch baking pan with parchment paper, leaving a bit of overhang on the sides. This simple step makes it so much easier to lift out your bars for slicing later—no sticky mess, just perfect edges!
Step 2: Process the Oats and Dates
Add those hearty rolled oats to your food processor and pulse until they’re slightly broken down but not powdery—you want texture! Next, toss in the pitted Medjool dates. Process until a sticky, cohesive dough starts to form. This will be the glue that brings all the strength and energy-building ingredients together.
Step 3: Mix the Dry Ingredients
Scoop the oat-date mixture into a large mixing bowl. Stir in the chopped almonds, dried cranberries, chia seeds, ground flaxseed, cinnamon, and sea salt. Each addition brings a new layer of crunch, color, flavor, and nutrition, turning this into the ultimate Homemade Energy Bars Packed with Strength and Energy base.
Step 4: Warm the Wet Ingredients
In a small saucepan over low heat, gently warm the peanut butter and honey (or maple syrup) together. Stir until everything melts into a silky smooth mixture—it should look glossy and smell divine! Remove from heat and stir in vanilla extract for that extra layer of coziness.
Step 5: Mix Everything Together
Pour the warm peanut butter mixture over the dry ingredients in your bowl. Use a sturdy spatula or even your (clean) hands to combine everything, ensuring all the dry bits get coated. Don’t worry if it seems sticky at first—that means the bars will hold together beautifully!
Step 6: Fold in the Chocolate Chips
Let the mixture cool for a minute, then gently fold in the dark chocolate chips. If you add them while it’s still too warm, they’ll melt slightly and create chocolate ribbons throughout (which honestly tastes amazing, so do what makes you happiest!).
Step 7: Press and Chill
Transfer the mixture into your lined pan. Press it down firmly using a spatula—or the back of a clean glass—so you get a tightly packed layer. Smooth the top as flat as you can. Refrigerate for at least 2 hours, or until everything is firm, easy to slice, and irresistibly chewy.
Step 8: Slice and Enjoy
Once chilled, use the parchment “handles” to lift out the slab. Slice into 12 even bars. You’ve just made Homemade Energy Bars Packed with Strength and Energy, ready for action, travel, or any snack craving!
How to Serve Homemade Energy Bars Packed with Strength and Energy
Garnishes
If you’re feeling a little fancy, sprinkle extra dark chocolate chips, a pinch of flaky sea salt, or a dusting of cinnamon over the top of your bars before chilling them. These tiny touches don’t just look pretty, they add extra bursts of flavor!
Side Dishes
Pair your energy bars with a creamy Greek yogurt bowl, a side of fresh fruit, or even a smoothie for a powerhouse breakfast or post-workout snack. They’re delicious alongside coffee or tea, bringing a cozy café vibe right to your kitchen.
Creative Ways to Present
Pop the bars into colorful snack bags for a lunchbox surprise, or stack them in mason jars for an eye-catching gift. Hosting a brunch? Arrange the bars in neat rows on a rustic wooden board, and let everyone grab one as they mingle—these Homemade Energy Bars Packed with Strength and Energy always impress!
Make Ahead and Storage
Storing Leftovers
Keep your bars fresh and chewy by storing them in an airtight container in the refrigerator. They’ll stay at their best for up to a week, making them perfect for advance meal prepping or grab-and-go snacking throughout busy days.
Freezing
If you want to stock up, place the sliced bars in a freezer-safe bag or container (layering parchment between them to prevent sticking). They’ll keep their taste and texture for up to three months—just defrost overnight in the fridge whenever you need a Homemade Energy Bar Packed with Strength and Energy.
Reheating
While these bars are meant to be enjoyed chilled or at room temperature, you can zap one in the microwave for 10 seconds if you love melty chocolate and a softer, cookie-like bite. Just be careful not to overheat, so they don’t get crumbly!
FAQs
Can I substitute other nuts or seeds?
Absolutely! You can use walnuts, pecans, sunflower seeds, or pumpkin seeds instead of almonds for your Homemade Energy Bars Packed with Strength and Energy, depending on your preferences or allergy needs.
What if I don’t have a food processor?
You can chop the dates very finely with a sharp knife and use your hands to mix and mash the oat mixture. It’ll take a little extra elbow grease, but the results are just as tasty!
Are these bars gluten-free?
Yes, as long as you use certified gluten-free oats, these Homemade Energy Bars Packed with Strength and Energy are entirely gluten-free—and naturally vegetarian, too!
Can I reduce the sugar content?
You can absolutely swap out some of the honey or maple syrup for additional nut butter, and try unsweetened dried fruit to make the bars less sweet while still keeping them moist and chewy.
How do I keep the bars from crumbling?
Packing the mixture very firmly into your pan is key, as is making sure you chill them until they’re completely set. If you find yours are a little loose, try adding an extra tablespoon of honey or nut butter to help them hold together perfectly.
Final Thoughts
If you crave a snack that’s delicious, wholesome, and actually energizes you, there’s no better treat than these Homemade Energy Bars Packed with Strength and Energy. I hope you’ll whip up a batch this week and share them with friends, family, or keep them all to yourself—you’ve earned it!