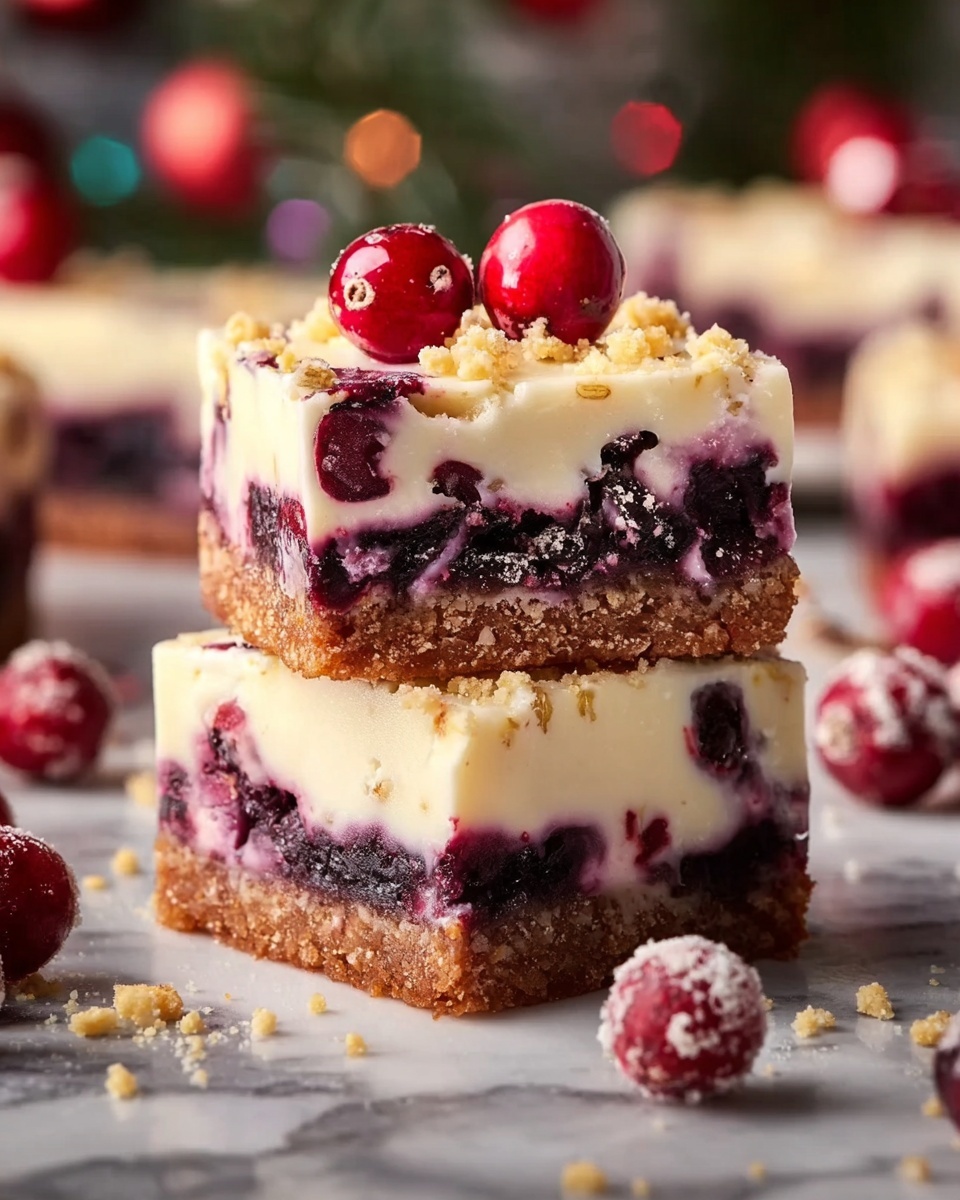
If you’re craving a festive dessert that feels both indulgent and approachable, you’re going to fall head over heels for this Christmas Cherry Cheesecake Bars Recipe. Imagine a buttery sugar cookie crust holding a luscious, creamy cheesecake filling, crowned with a vibrant cherry topping and toasted almonds for that perfect crunch. These bars are not only stunning on the holiday table but also manage to balance sweet and tangy in every bite, making them a guaranteed crowd-pleaser. Whether you’re serving guests or simply treating yourself, these cheesecake bars bring all the cozy, celebratory vibes you want this season.
Ingredients You’ll Need
This Christmas Cherry Cheesecake Bars Recipe relies on a handful of simple yet crucial ingredients that harmonize beautifully together. Each ingredient plays a vital role in layering flavors and textures—from the crumbly base to the creamy center and the bright cherry topping—making the final dessert truly irresistible.
- Sugar Cookie Mix: The foundation for the crust, providing sweetness and structure with ease and convenience.
- Cold Unsalted Butter: Adds richness and helps create that satisfying buttery, crumbly texture in the crust.
- Softened Cream Cheese: Key for the creamy, tangy cheesecake layer that melts in your mouth.
- Granulated Sugar: Sweetens the cheesecake filling just right without overpowering the tanginess.
- All-Purpose Flour: Gives the cheesecake mixture a subtle firmness so the bars slice neatly.
- Vanilla Extract: Brings warmth and depth to the cheesecake’s flavor profile.
- Egg: Helps bind the cheesecake filling together beautifully.
- Cherry Pie Filling: The festive burst of sweet-tart flavor that makes these bars truly holiday-worthy.
- Toasted Sliced Almonds: Adds a lovely crunch and a nutty aroma to the topping, rounding out the textures.
How to Make Christmas Cherry Cheesecake Bars Recipe
Step 1: Prepare Your Baking Pan
Start by preheating your oven to 350°F (175°C). Line an 8×8-inch or 9×13-inch baking pan with foil and spray it generously with non-stick spray. This step ensures the bars won’t stick and will lift out easily when it’s time to serve.
Step 2: Make the Crust
Combine the sugar cookie mix with cold unsalted butter in a large bowl. Use a pastry blender or your fingers to work the butter into the mix until it resembles coarse crumbs. Set aside about ¾ cup of this crumbly mixture for the topping later. Press the remaining crumbs firmly into the bottom of your prepared pan to form an even crust. Bake for 10 minutes, then let it cool slightly—it might look a little underdone, but that’s perfect for this recipe.
Step 3: Prepare the Cheesecake Layer
While the crust cools, whisk together the softened cream cheese, granulated sugar, all-purpose flour, vanilla extract, and one egg until the mixture is smooth and creamy without lumps. This mixture is where that luscious cheesecake texture shines, so take your time to get it silky.
Step 4: Assemble the Layers
Spread the cheesecake filling evenly over the cooled crust, smoothing it out with a spatula. Then, spoon the cherry pie filling all over the cheesecake layer, distributing it evenly to showcase that festive swirl of deep red. The contrast in layers is what makes these bars so visually inviting.
Step 5: Add the Topping
Mix the reserved crumbly sugar cookie mixture with the toasted sliced almonds in a small bowl. Sprinkle this mixture generously over the cherry layer. The nuts add a perfect crunch that contrasts beautifully with the creamy cheesecake and juicy cherries.
Step 6: Final Bake
Bake the assembled bars for 40 minutes if you’re using an 8×8 pan, or 45 minutes for a 9×13. You’re looking for a beautiful light golden brown top that signals everything has set perfectly.
Step 7: Cool and Chill
Allow your Christmas Cherry Cheesecake Bars to cool at room temperature for about 30 minutes. Then transfer them to the refrigerator to chill for a few hours or until firm. This chilling step helps the flavors meld and makes slicing much easier.
How to Serve Christmas Cherry Cheesecake Bars Recipe

Garnishes
For an extra festive touch, add a dusting of powdered sugar or a drizzle of white chocolate over the bars before serving. Fresh mint leaves or a few whole cherries can also add pops of color and freshness that make these treats look even more special.
Side Dishes
Pair these bars with a warm cup of spiced hot cocoa, mulled wine, or a rich coffee for a cozy holiday experience. A scoop of vanilla ice cream alongside adds an indulgent creaminess that complements the tangy cherry topping wonderfully.
Creative Ways to Present
Try cutting the bars into festive shapes using cookie cutters like stars or bells for parties. Arrange them on a decorative platter layered with evergreen sprigs or holiday ribbons to make a show-stopping centerpiece dessert. If gifting, wrap individual bars with parchment and tie with a cheerful bow for a homemade holiday treat that feels personal and delightful.
Make Ahead and Storage
Storing Leftovers
You’re going to want leftovers after tasting these, but no worries! Keep them in an airtight container in the refrigerator for up to five days. This keeps them fresh, soft, and flavorful, ready for an indulgent snack whenever the craving hits.
Freezing
These bars freeze beautifully if you want to prepare well in advance. Wrap them tightly in plastic wrap and foil, or place them in a freezer-safe container. Freeze for up to three months. When ready to enjoy, thaw overnight in the fridge for the best texture and flavor.
Reheating
While these cheesecake bars are best enjoyed chilled, if you prefer them slightly warmed, place a single serving in the microwave for 10-15 seconds. Just enough to take the chill off and soften the filling without compromising the texture.
FAQs
Can I use fresh cherries instead of canned cherry pie filling?
Absolutely! Fresh cherries can make these bars taste even more vibrant. Pit and chop them, then gently cook with a bit of sugar and cornstarch until thickened to create your own cherry topping. This way, you control the sweetness and get a fresh burst of flavor.
Can I freeze these bars?
Yes, freezing is a great way to keep these delightful bars ready for any occasion. Just make sure to wrap them well to prevent freezer burn. When it’s time, thaw them overnight in the fridge and serve cold or slightly warmed.
How do I cut the bars neatly?
Use a sharp, clean knife and wipe the blade between cuts to keep each slice clean and tidy. Chilling the bars thoroughly before cutting also helps create neat edges without crumbling.
Can I make these bars ahead of time?
Definitely! In fact, they taste better when made a day ahead since chilling allows the flavors to meld wonderfully. This makes the Christmas Cherry Cheesecake Bars Recipe ideal for stress-free holiday entertaining.
What other toppings can I use besides cherries?
If you want to mix it up, try other berry toppings like blueberries or strawberries, or even a swirl of caramel or chocolate drizzle. Just ensure the topping pairs well with the creamy cheesecake base to maintain balance in flavors.
Final Thoughts
These Christmas Cherry Cheesecake Bars are a heartwarming addition to any holiday celebration, combining simple ingredients into a spectacularly festive dessert. The blend of creamy cheesecake, sweet cherries, and crunchy almonds creates a memorable treat that everyone will ask for again and again. I can’t wait for you to try this Christmas Cherry Cheesecake Bars Recipe and bring a little extra joy to your dessert table this season!