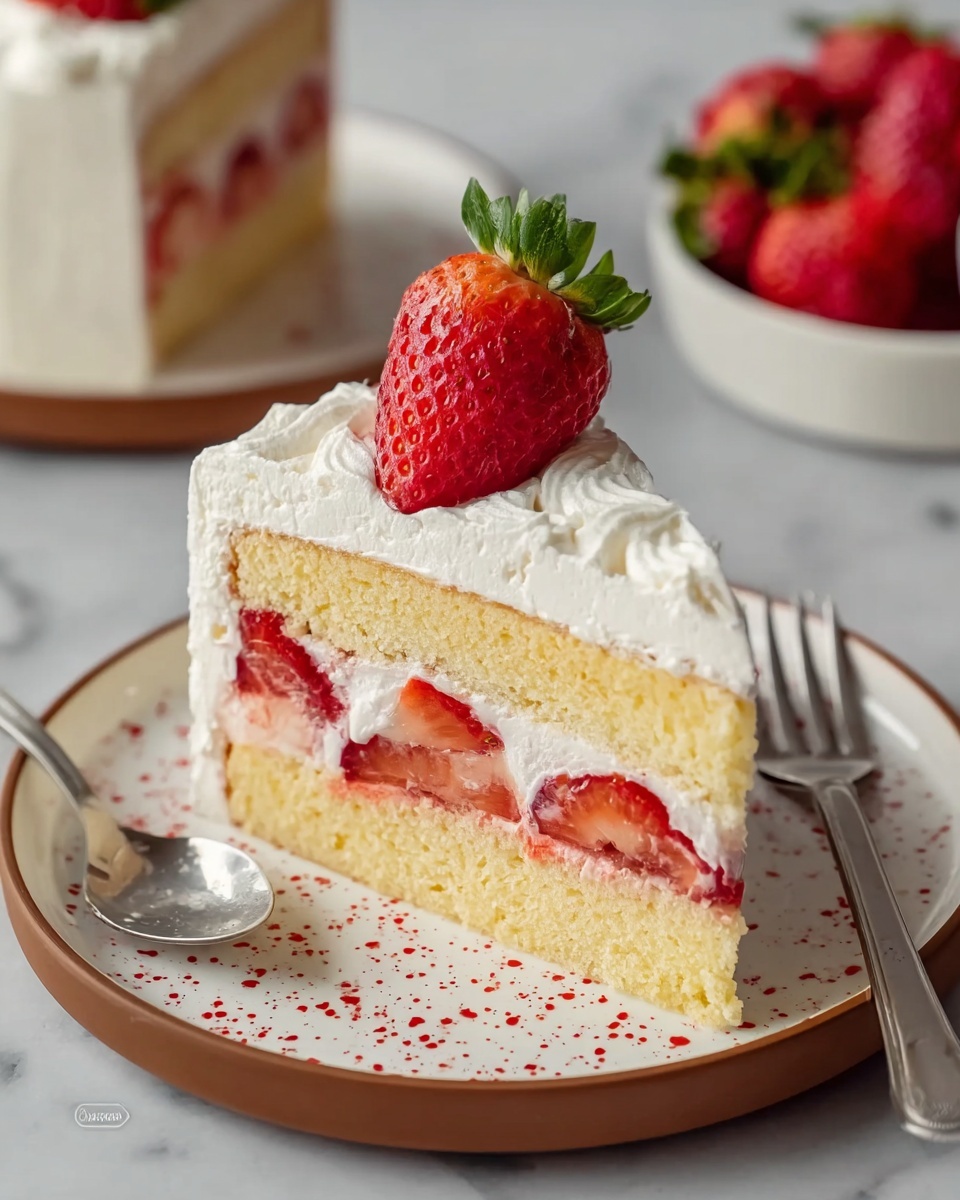
If you’ve ever dreamed of a dessert that looks as delicate as a flower and tastes like a sweet slice of heaven, then let me introduce you to the Japanese Strawberry Cake Recipe. This cake is a beautiful balance of airy sponge, luscious whipped cream, and fresh, juicy strawberries that come together to create something truly magical. Light yet indulgent, it’s a celebration of fresh flavors and simple textures that’s perfect for any occasion. Once you try this recipe, it just might become your go-to cake for sharing smiles and creating memories.
Ingredients You’ll Need
This Japanese Strawberry Cake Recipe calls for simple yet essential ingredients that each play a distinct role in making the cake fluffy, flavorful, and visually stunning. From the soft cake base to the creamy frosting and fresh strawberries, every component shines through in the final masterpiece.
- Whole milk (80 g / 1/3 cup): Adds moisture and richness to the tender cake crumb.
- Unsalted butter (50 g / 3 1/2 tablespoons): Provides a subtle buttery flavor and moist texture.
- Cake flour (75 g / 1/2 cup + 1/2 tablespoon): Keeps the sponge delicate and light compared to regular flour.
- Large egg yolks (4): Bring richness and help emulsify the batter.
- Large egg whites (4): The secret to the airy sponge through a gentle meringue.
- Sugar (70 g / 5 1/2 tablespoons): Sweetens the cake and stabilizes the whipped egg whites.
- Strawberries (12 oz to 1 lb / 340 g to 450 g): The star ingredient, for both decoration and juicy layers.
- Sugar for macerating (1 1/2 teaspoons): Enhances the strawberries’ natural sweetness.
- Heavy whipping cream (280 g / 10 oz): Whipped into fluffy cream for frosting and filling.
- Confectioners sugar (2 tablespoons): Sweetens the cream without grittiness.
- Gelatin (3/4 teaspoon, optional): Stabilizes whipped cream for longer-lasting texture.
- Cold water for gelatin (2 tablespoons, optional): Used to bloom the gelatin properly.
- Additional sugar (2 tablespoons): For making a simple syrup to keep the cake moist.
- Hot water (3 tablespoons): Dissolves the sugar for the syrup and helps create a moist crumb.
How to Make Japanese Strawberry Cake Recipe
Step 1: Prepare the Cake Pan
Start by lining the bottom of an 8-inch round cake pan with parchment paper to prevent sticking. Preheat your oven to 325°F (160°C). To create a gentle and even baking environment, prepare a water bath by placing your cake pan inside a larger pan or baking dish and filling the outer vessel with hot water up to about one inch high. If your pan has a removable bottom, be sure to wrap it with foil to avoid any leaks during baking.
Step 2: Make the Batter
In a heatproof bowl, melt whole milk and unsalted butter together until smooth. Then sift in cake flour and gently mix. Add the egg yolks and combine until you get a smooth and cohesive mixture. This part creates the rich and tender base for the airy sponge.
Step 3: Beat the Egg Whites
In a clean bowl, whip the egg whites on medium-high speed until they become frothy. Gradually add the sugar while continuing to beat until you have glossy medium peaks. This meringue is the magic that turns the cake light and fluffy without being dense.
Step 4: Combine Mixtures
Gently fold about a quarter of the whipped egg whites into the yolk mixture to lighten it. Then pour this back into the remaining egg whites. Fold carefully until fully incorporated, but avoid overmixing to keep all the air bubbles intact.
Step 5: Bake the Cake
Pour the batter into your lined cake pan and lightly tap the pan to release large air bubbles that can cause uneven texture. Place the pan in the water bath and carefully add more hot water to maintain one-inch depth beside the cake. Bake for 1 hour and 30 minutes until the cake is set and a skewer poked in the center comes out clean. Allow it to cool completely on a wire rack, which is key to maintaining its moist, delicate texture.
Step 6: Macerate the Strawberries
While your cake cools, slice roughly 8 ounces of strawberries and sprinkle them with 1 1/2 teaspoons of sugar. Let them rest for 1 to 2 hours until they release their sweet juices. This maceration step intensifies the strawberry flavor and adds natural moisture to the cake layers.
Step 7: Make the Simple Syrup
Dissolve 2 tablespoons of sugar into 3 tablespoons of hot water. For an extra burst of strawberry goodness, whisk in a bit of the reserved strawberry juice from the macerated berries. The syrup keeps your cake tender and adds subtle sweetness between the layers.
Step 8: Prepare the Whipped Cream
Whip the heavy cream with confectioners sugar until firm peaks form. For a stabilized cream that holds shape longer, bloom gelatin in cold water, melt it gently, then blend it into softly whipped cream before whipping to soft peaks. This cream coats and fills the cake with an irresistible lightness.
Step 9: Slice and Soak the Cake Layers
Once cooled, slice off the lightly browned top layer for a clean look. Cut the cake horizontally into two even layers using a serrated knife. Generously brush the exposed cake surfaces with your strawberry syrup, ensuring each bite is moist and flavorful.
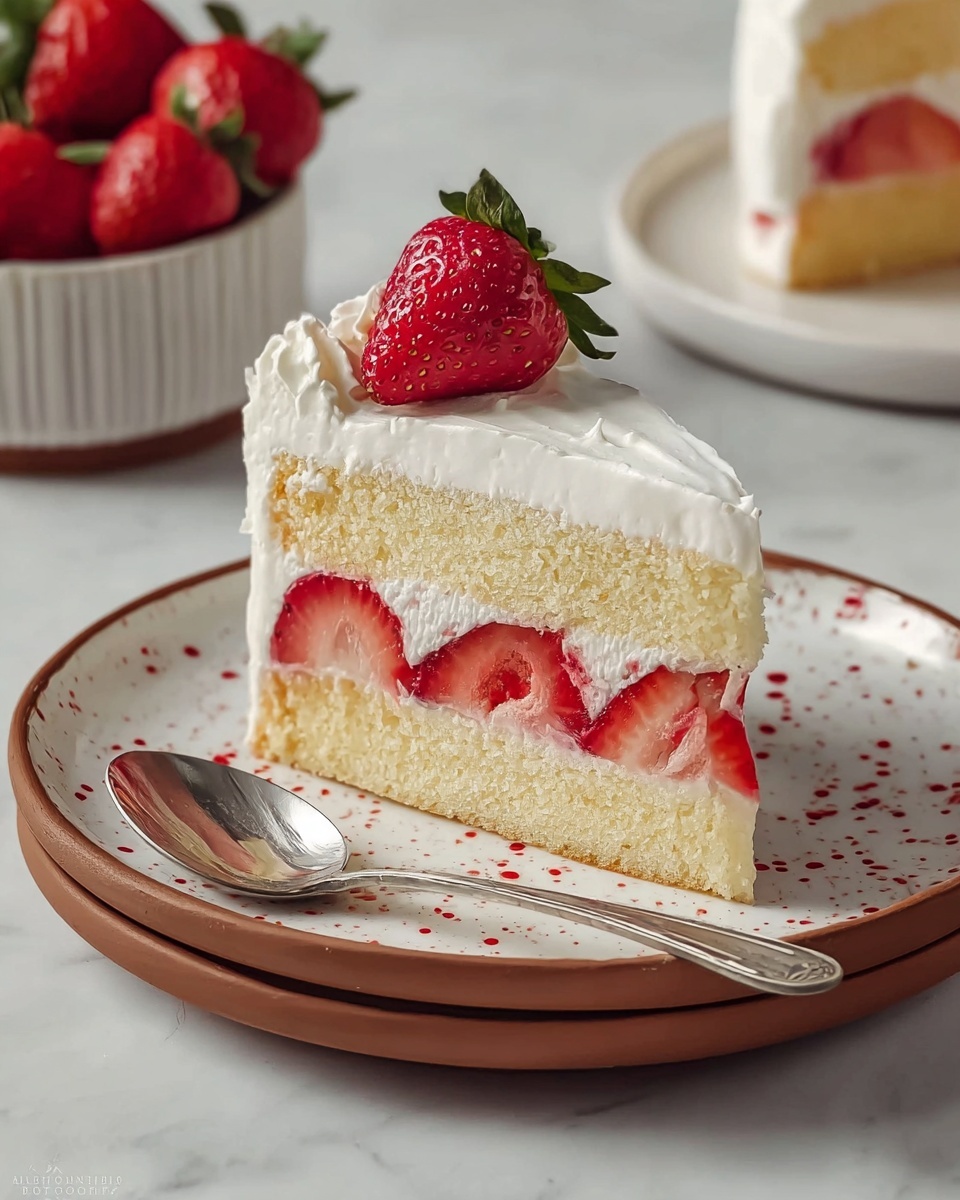
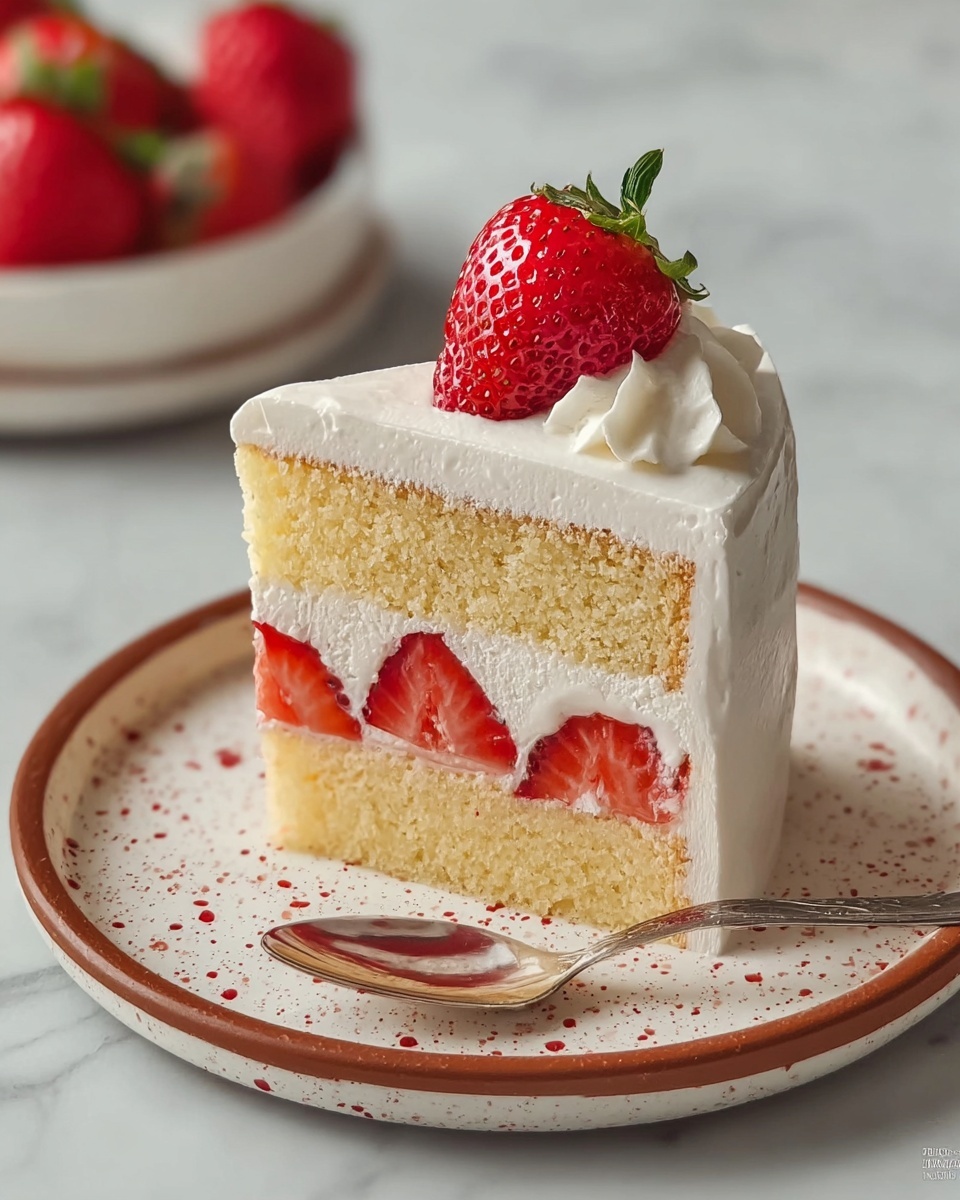
Step 10: Assemble the Cake
Place the bottom cake layer on a serving stand. Spread a thin layer of whipped cream, then top with the sliced macerated strawberries followed by another layer of cream. Add the second cake layer on top and brush it with more syrup. This layering creates a harmonious balance of creamy and fruity textures.
Step 11: Frost and Decorate
Apply a thin crumb coat of whipped cream over the entire cake to lock everything in place. Next, pile on a thicker layer of cream to create a smooth, elegant finish. Use any leftover cream in a piping bag to add pretty decorations, then crown your cake with whole or halved strawberries for that iconic look.
Step 12: Chill and Serve
If you’ve used stabilized cream, refrigerate the cake uncovered for at least 30 minutes to set. If not, serve immediately or within a few hours for the best texture. Let the cake come to room temperature before slicing to truly enjoy its delicate crumb and creamy layers. Now, dig in and savor every bite of this Japanese Strawberry Cake Recipe masterpiece!
How to Serve Japanese Strawberry Cake Recipe
Garnishes
A few fresh strawberries on top are classic and delicious, but why stop there? Try adding small edible flowers or a light dusting of powdered sugar to make your cake look like it just stepped out of a Japanese patisserie. A sprig of mint adds a pop of color and freshness that pairs beautifully with the strawberry sweetness.
Side Dishes
This cake shines when paired with light accompaniments. A scoop of vanilla bean ice cream or a small dollop of matcha green tea whipped cream could elevate the experience. If you’re feeling adventurous, a cup of jasmine tea or a delicate sencha will perfectly complement the sweet and airy flavors of the cake.
Creative Ways to Present
For a charming party centerpiece, serve slices on pretty vintage plates with rose-patterned napkins. You might also try layering the remaining macerated strawberries and cream in individual glass cups alongside mini cake slices for easy, elegant single servings. These ideas add a playful twist and make the Japanese Strawberry Cake Recipe even more special to share with your loved ones.
Make Ahead and Storage
Storing Leftovers
Because this cake is made with fresh whipped cream, it’s best stored in the refrigerator. Cover it loosely with plastic wrap or a cake dome to keep it from drying out or absorbing other flavors. Consume within 2 to 3 days for the best taste and texture.
Freezing
Freezing cream-based cakes can be tricky, but if you need to, slice the cake first, wrap each piece tightly in plastic wrap and aluminum foil, then freeze. Thaw overnight in the refrigerator. Keep in mind that the whipped cream might lose some of its fluffy texture after freezing, so enjoy within a week.
Reheating
Since this is a cold dessert, reheating isn’t necessary. Instead, let refrigerated or thawed cake come to room temperature for about 30 minutes before serving so the flavors and textures soften and shine at their best.
FAQs
Can I make this cake without gelatin?
Absolutely! The gelatin is optional and helps stabilize the whipped cream so it holds its shape longer. If you plan to serve the cake soon after making it, you can skip the gelatin and still enjoy a beautifully light and fluffy finish.
What is the best type of strawberries for this recipe?
Look for fresh, ripe strawberries that are fragrant and bright red. They should be firm yet juicy for the best flavor and texture. Avoid overly soft or mushy berries as they won’t hold up well in the layers.
Can I substitute heavy whipping cream?
Heavy cream is preferred because it whips easily into stable peaks. Light cream or half-and-half won’t whip properly and won’t give you that classic fluffy frosting, so it’s best to stick with heavy cream for this recipe.
How long does the baking take?
This cake requires slow, gentle baking in a water bath for 1 hour and 30 minutes. This ensures the sponge is cooked through while staying moist and tender, so patience really pays off for the perfect texture.
Is this cake gluten-free?
Traditional cake flour contains gluten, so this Japanese Strawberry Cake Recipe is not gluten-free. However, with the right gluten-free flour blend designed for cakes, you might experiment to create a gluten-friendly version.
Final Thoughts
If you’re looking for a show-stopping dessert that feels like a hug in cake form, I can’t recommend this Japanese Strawberry Cake Recipe enough. It’s elegant yet approachable, and the combination of light sponge, whipped cream, and fresh strawberries is truly irresistible. Whether for a special celebration or a sweet treat to brighten your day, this cake invites you to slow down, savor, and share a little joy slice by slice.