If you’re craving a dish that bursts with intense garlic flavor bounded by herby warmth and topped with delightful crispy texture, this Garlic Brined Chicken with Crispy Sage Recipe is your new best friend in the kitchen. This recipe combines the magic of a simple salt and herb brine with the mouthwatering contrast of tender chicken and crisp fried sage leaves. Each bite offers juicy, perfectly seasoned chicken elevated by the deep aroma of garlic and the subtle earthiness of sage, making it a standout dish that’s surprisingly easy to prepare but impressive enough to serve for any occasion.

Ingredients You’ll Need
The beauty of this Garlic Brined Chicken with Crispy Sage Recipe lies in its simplicity. Each ingredient plays a crucial role: the salt locks in moisture, garlic infuses robust flavor, sage adds herbal depth, and butter and olive oil create a luscious cooking base that crisps the chicken to perfection.
- 4 cups cold water: The foundation of the brine that keeps the chicken juicy and tender.
- 1/3 cup table salt: Essential for seasoning and helping the chicken retain moisture during cooking.
- 20 sage leaves (divided): Half for the brine and garlic mingle, while the rest create irresistible crispy garnishes.
- 4 cloves garlic (minced): Adds a fragrant, savory punch that infuses throughout the chicken.
- 4 chicken breasts: The star protein, perfect for a quick yet impressive main dish.
- 2 tablespoons unsalted butter: Enhances richness and helps achieve a golden sear.
- 3 tablespoons good olive oil (divided): Used for cooking the chicken and crispy sage, adding a subtle fruity depth.
- Garnish: Fried sage leaves: These leaves add a crunchy herbal surprise that elevates presentation and texture.
How to Make Garlic Brined Chicken with Crispy Sage Recipe
Step 1: Prepare the Brine and Chicken
Start by dissolving the salt in cold water in a large bowl. Add 8 of the sage leaves, minced garlic, and chicken breasts, ensuring the poultry is completely submerged. This brining process only takes 15 minutes but works wonders to infuse flavor and keep the chicken moist and tender during cooking.
Step 2: Remove Chicken and Reserve Flavorful Bits
Take the chicken out and set it on a paper towel-lined plate to dry. Strain the brine liquid, catching the garlic and sage leaves — you’ll be adding these back into the pan later for an extra flavor boost. No need to keep the brine liquid itself after this step.
Step 3: Pat Chicken Dry
Completely drying the chicken is key to getting a beautiful golden sear. Use paper towels to gently blot each breast, removing excess moisture.
Step 4: Heat Butter and Olive Oil
Preheat a large non-stick or well-seasoned skillet over medium heat. Melt the butter and add 2 tablespoons of olive oil. This rich mix will give your chicken a gorgeous crust and delicious flavor dimension.
Step 5: Cook Chicken on First Side
Place your chicken breasts in the hot pan and cook undisturbed for 5 minutes. This initial sear seals in the juices and starts the caramelization process that makes the crust simply irresistible.
Step 6: Add Reserved Sage and Garlic
After the first 5 minutes, sprinkle the reserved sage leaves and garlic from the brine into the pan. Their presence steams and crisps alongside the chicken, infusing the meat with fragrant herbal notes.
Step 7: Flip Chicken and Continue Cooking
Turn the breasts over and cook for another 3 minutes to brown the other side and continue cooking the chicken through.
Step 8: Lower Heat and Cover
Reduce the heat to low and cover the skillet with a lid. Let the chicken cook gently for 2 more minutes, allowing heat to penetrate evenly and the flavors to meld beautifully.
Step 9: Check Temperature for Doneness
Use a meat thermometer to check the chicken’s internal temperature; it should read 160°F for safe and juicy perfection. If it needs more time, cover and cook briefly until done.
Step 10: Rest the Chicken
Remove the pan from heat but keep the lid on, letting the chicken rest for 2 minutes. This step allows juices to redistribute so every bite is juicy and flavorful.
Step 11: Fry the Remaining Sage Leaves
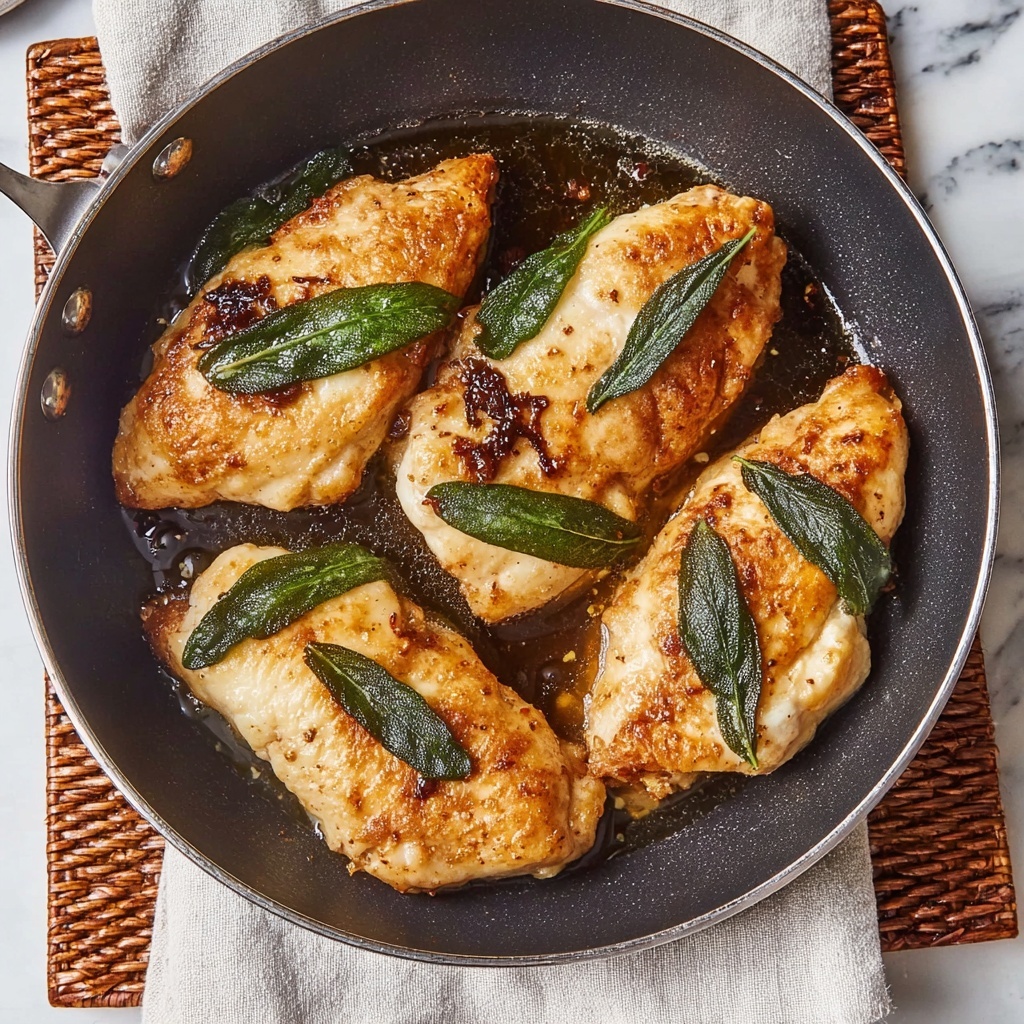
Add a tablespoon more olive oil to the pan if needed and heat it over medium. Fry the extra 12 sage leaves for a few seconds on each side just until crisp and fragrant. Transfer them to a paper towel to drain excess oil. These crispy sage leaves bring texture and an aromatic crunch to the dish.
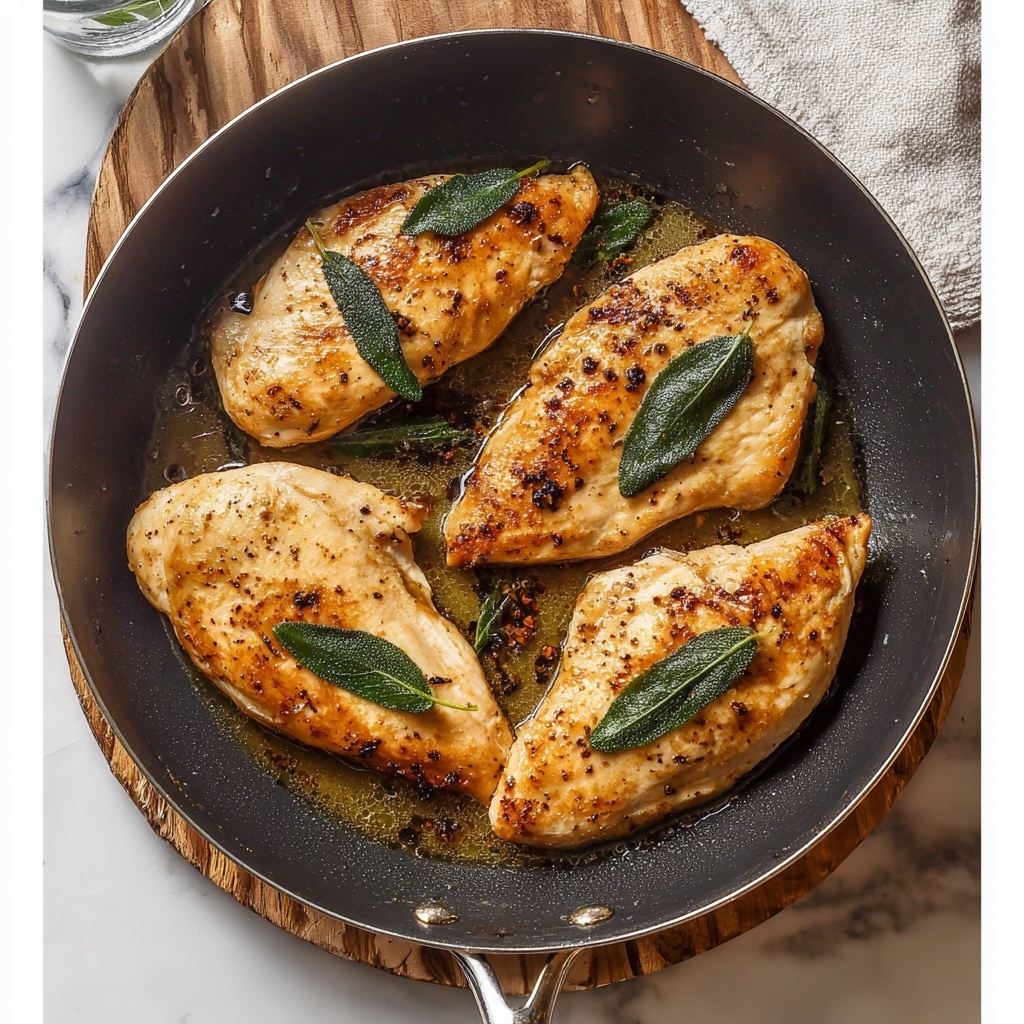
Step 12: Plate and Serve
Arrange the chicken breasts on a serving dish and drizzle with the luscious pan juices. Top with the crispy sage leaves for a beautiful, restaurant-quality finish.
How to Serve Garlic Brined Chicken with Crispy Sage Recipe
Garnishes
Besides the show-stopping crispy sage, a sprinkle of freshly cracked black pepper or a few lemon wedges on the side enhances the flavors brilliantly. The lemon provides a bright contrast that cuts through the richness and complements the garlic’s earthy charm.
Side Dishes
This dish pairs wonderfully with creamy mashed potatoes, roasted seasonal vegetables, or even a fresh arugula salad drizzled with lemon vinaigrette. The combination brings balance and adds different textures to your meal.
Creative Ways to Present
For a fun twist, slice the garlic brined chicken and arrange it over a bed of soft polenta or grilled asparagus. Drizzle pan juices over the top and sprinkle with extra fried sage. It’s an elegant way to impress guests or treat yourself to something special!
Make Ahead and Storage
Storing Leftovers
Any leftover chicken can be refrigerated in an airtight container for up to 3 days. Keep the crispy sage separate to maintain its crunch, adding it fresh when reheating.
Freezing
This chicken freezes well if stored properly. Wrap each breast tightly in plastic wrap, then place in a freezer-safe bag. Freeze for up to 2 months for convenient, flavorful meals later.
Reheating
Reheat gently in a low oven or in a skillet over medium-low heat to avoid drying out the chicken. Add the crispy sage leaves just before serving to keep their texture intact and the flavors vibrant.
FAQs
What does brining do for chicken?
Brining infuses moisture and flavors into the chicken, helping it stay juicy and tender when cooked. Salt in the brine also enhances the meat’s natural taste.
Can I use other herbs instead of sage?
Absolutely! Thyme or rosemary work well, but sage has a unique earthy aroma that perfectly complements garlic and chicken.
How long should I brine the chicken?
For this recipe, a short 15-minute brine is enough to impart flavor without being overpowering or changing the texture too much.
Is it important to pat the chicken dry?
Yes, drying the chicken ensures it sears properly, creating a beautiful crust and preventing it from steaming in the pan.
Can I use bone-in chicken breasts?
You can, but cooking times will be longer. Use a meat thermometer to ensure the chicken reaches 160°F internally for safety and tenderness.
Final Thoughts
There’s something truly special about this Garlic Brined Chicken with Crispy Sage Recipe—a simple collection of ingredients that come together to create layers of vibrant, comforting flavor and memorable texture. Whether you’re cooking a weeknight dinner or impressing guests, it’s a dish that feels both effortless and luxurious. I encourage you to try it soon and enjoy the magic that a little garlic, sage, and love can bring to your table!