
If you’re craving a dessert that feels indulgent yet comes together in a snap, you’re going to adore this Easy Chocolate Mousse in Homemade Chocolate Cups Recipe. Picture silky, cloud-like chocolate mousse nestled inside crisp, glossy chocolate cups that you made yourself. It’s a fun, impressive treat that doesn’t require hours in the kitchen, and best of all, it tastes like something from a fancy patisserie. Whether you’re hosting a dinner party or just treating yourself, this recipe transforms simple ingredients into a show-stopping dessert experience that everyone will rave about.
Ingredients You’ll Need
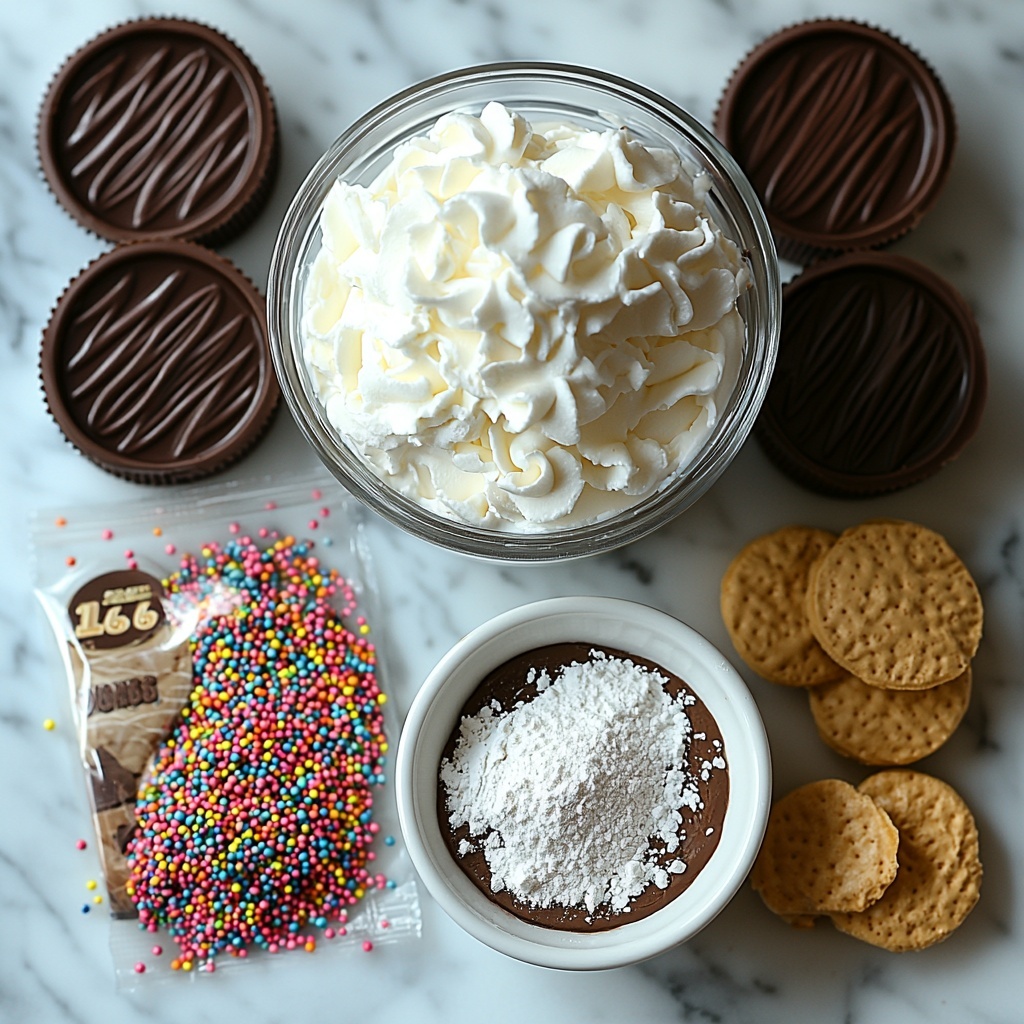
Getting the right ingredients is the first step to master this Easy Chocolate Mousse in Homemade Chocolate Cups Recipe. Each item plays a key role, whether it’s lending richness, sweetness, or that perfect chocolate flavor and texture that’ll make your mousse utterly irresistible.
- Heavy Cream: The backbone of the mousse, heavy cream whips up into a luxurious, airy base that makes the mousse so delightfully smooth.
- Confectioners’ Sugar: A bit of powdered sugar adds just the right touch of sweetness while dissolving seamlessly into the mousse for a silky finish.
- Whipped Topping: This lightens the mixture further, adding a creamy texture that melts in your mouth.
- Chocolate Fudge Instant Pudding Mix (dry): Adds deep chocolate flavor and a luscious texture without complicated cooking steps.
- Baking Chocolate or Chocolate Chips: Used to create the homemade chocolate cups, these form a crisp, shiny shell that holds the mousse perfectly.
- Silicone Baking Mold: An easy way to shape your chocolate cups without sticking or mess.
- Sprinkles: Optional, but a fun and colorful garnish that adds whimsy and crunch to each bite.
How to Make Easy Chocolate Mousse in Homemade Chocolate Cups Recipe
Step 1: Prepare the Chocolate Cups
Start by melting your baking chocolate or chocolate chips gently in the microwave. Heat in 30-second intervals, stirring in between to avoid burning and ensure smooth, glossy chocolate perfect for forming your cups. Using a pastry brush, paint a thin layer of this melted chocolate inside each cavity of your silicone baking mold. Pop them in the refrigerator for about 10 minutes to set, then apply another layer for added strength. Once finished, place the molds in the freezer for at least an hour. This ensures your homemade chocolate cups will be sturdy and crisp, ready to cradle the luscious mousse.
Step 2: Whip Up the Chocolate Mousse
With your chocolate cups chilling, it’s time to get that mousse going. In a mixing bowl, combine heavy cream, confectioners’ sugar, and the dry chocolate fudge pudding mix. Beat these together for 2-3 minutes—use a hand mixer or stand mixer for the best results. The mixture will thicken and become wonderfully fluffy. Then, gently fold in the whipped topping, adding an extra layer of creaminess and light texture that will make every spoonful feel like a dream. This mousse is incredibly easy to make but delivers rich chocolate flavor and a breathtakingly smooth mouthfeel.
Step 3: Assemble the Dessert
Once your chocolate cups are fully hardened and your mousse is whipped to perfection, it’s time to assemble. Use a dessert decorator or a small spoon to carefully fill each cup with the mousse, creating pretty mounds or smooth surfaces—whatever you prefer! Finish by sprinkling your choice of colorful sprinkles over the top to add a playful crunch and visual appeal. Refrigerate just a bit if you like, or serve immediately to enjoy the crisp cup contrasting with the velvety mousse.
How to Serve Easy Chocolate Mousse in Homemade Chocolate Cups Recipe
Garnishes
Elevate your Easy Chocolate Mousse in Homemade Chocolate Cups Recipe with thoughtful garnishes that add flavor, texture, and a pop of color. Fresh berries such as raspberries or strawberries add a tart freshness that cuts through the richness. A dusting of cocoa powder or edible gold leaf can lend an elegant touch perfect for special occasions. Crushed nuts or a sprinkle of sea salt can also bring a delightful crunch and flavor contrast.
Side Dishes
This dessert shines on its own, but if you want to pair it, light accompaniments work best. A simple mixed green salad with a citrus vinaigrette can balance the decadence, or a small scoop of vanilla or coffee ice cream will add a creamy chill that complements the mousse perfectly. Fresh fruit salad or candied orange peel also make refreshing sides that keep the chocolate experience feeling fresh and bright.
Creative Ways to Present
Have fun with presentation! Serve these chocolate cups on a rustic wooden board or a modern glass tray to impress guests visually. Try stacking various sizes of chocolate cups or placing them next to edible flowers for a whimsical look. For a festive touch, nestle each cup in a mini cupcake liner that matches your party’s color scheme. Little touches like these enhance the whole dessert experience and make your Easy Chocolate Mousse in Homemade Chocolate Cups Recipe unforgettable.
Make Ahead and Storage
Storing Leftovers
If you happen to have leftovers, store the mousse-filled chocolate cups in an airtight container in the refrigerator. They will keep best for 2-3 days, maintaining the mousse’s creaminess and the cups’ crispness. Just be sure to cover them well to prevent them from absorbing any fridge odors or drying out.
Freezing
While the mousse itself can be frozen, freezing assembled mousse in chocolate cups is not recommended since the cups may lose their delicate texture and become brittle or soggy upon thawing. Instead, freeze the mousse separately in a sealed container. When ready to serve, thaw it in the fridge and fill freshly made chocolate cups for the best taste and texture.
Reheating
This dessert is meant to be enjoyed chilled and shouldn’t be reheated. The silky mousse and the chocolate cups are best served cold to keep their contrasting textures intact. Simply pull it from the fridge a few minutes before serving to take the chill off slightly, if preferred.
FAQs
Can I use dark chocolate for the cups?
Absolutely! Dark chocolate will give your cups a rich, intense chocolate flavor that contrasts beautifully with the sweet mousse. Just make sure to use good-quality chocolate for the best texture and shine.
Is there a substitute for the instant pudding mix?
If you don’t have instant pudding mix, you can make the mousse with melted chocolate and gelatin, but it requires a bit more technique. The instant pudding mix keeps this Easy Chocolate Mousse in Homemade Chocolate Cups Recipe incredibly simple and foolproof!
How long does it take to make this dessert?
From start to finish, including chocolate cup preparation and mousse whipping, it takes about 20 minutes plus chilling time. Most of that is hands-off while the cups harden in the fridge or freezer.
Can I make the chocolate cups in advance?
Yes, you can prepare the chocolate cups up to a day ahead. Store them in an airtight container at room temperature or in the refrigerator until ready to fill with mousse.
What if I don’t have silicone baking molds?
You can create chocolate cups by brushing melted chocolate inside small oven-safe bowls or even balloon molds for a creative twist. Just make sure whatever you use is non-stick and easy to remove once the chocolate hardens.
Final Thoughts
This Easy Chocolate Mousse in Homemade Chocolate Cups Recipe is one of those desserts that feels so special, yet is surprisingly effortless. From the satisfying crunch of the handmade chocolate cups to the luscious, dreamy mousse inside, every bite is a celebration of chocolate bliss. Give it a try and watch it become a favorite for all occasions—nothing beats impressing yourself and your loved ones with something this delicious and delightful!
Print
Easy Chocolate Mousse in Homemade Chocolate Cups Recipe
- Prep Time: 15 minutes
- Cook Time: 5 minutes (melting and setting chocolate)
- Total Time: 1 hour 20 minutes
- Yield: 10 servings
- Category: Dessert
- Method: No-Cook
- Cuisine: American
- Diet: Vegetarian
Description
This easy chocolate mousse recipe features light and fluffy mousse served in homemade chocolate cups, perfect for an impressive yet simple dessert. The mousse combines heavy cream, confectioners’ sugar, whipped topping, and instant chocolate pudding mix, all sitting inside sturdy chocolate bowls decorated with sprinkles for a delightful presentation.
Ingredients
Chocolate Mousse
- 2 cups Heavy Cream
- ¼ cup Confectioners’ Sugar
- 1 cup Whipped Topping
- 3.9 oz Chocolate Fudge Instant Pudding Mix (dry)
Chocolate Cups
- Baking Chocolate or Chocolate Chips (quantity as needed to coat molds)
- Sprinkles (for topping)
Instructions
- Make Chocolate Cups: Melt baking chocolate or chocolate chips in a small microwave-safe bowl by heating in 30-second intervals, stirring between each until fully melted and smooth.
- Coat Silicone Molds: Use a pastry brush to paint the inside of silicone baking molds with melted chocolate. Place molds in the refrigerator for about 10 minutes to set the chocolate layer.
- Build Up Chocolate Layers: Remove molds from the refrigerator and paint the inside again with another layer of melted chocolate. Place molds in the freezer for at least one hour until the chocolate cups are solid and sturdy.
- Prepare Mousse: Using a stand mixer or hand mixer, beat together heavy cream, confectioners’ sugar, and dry chocolate pudding mix for 2-3 minutes until light and fluffy.
- Fold in Whipped Topping: Gently stir the whipped topping into the whipped cream mixture until well combined to create a smooth mousse texture.
- Fill and Decorate: Using a dessert decorator or spoon, fill the hardened chocolate cups with the prepared mousse. Top with sprinkles as a finishing touch.
Notes
- Use silicone molds for easy removal of chocolate cups.
- Ensure chocolate layers are thick enough to form sturdy cups by applying multiple coats.
- The mousse can be prepared ahead and refrigerated before filling the cups.
- Chilling the filled cups before serving enhances the mousse texture.
- For a richer chocolate flavor, use high-quality baking chocolate.


