
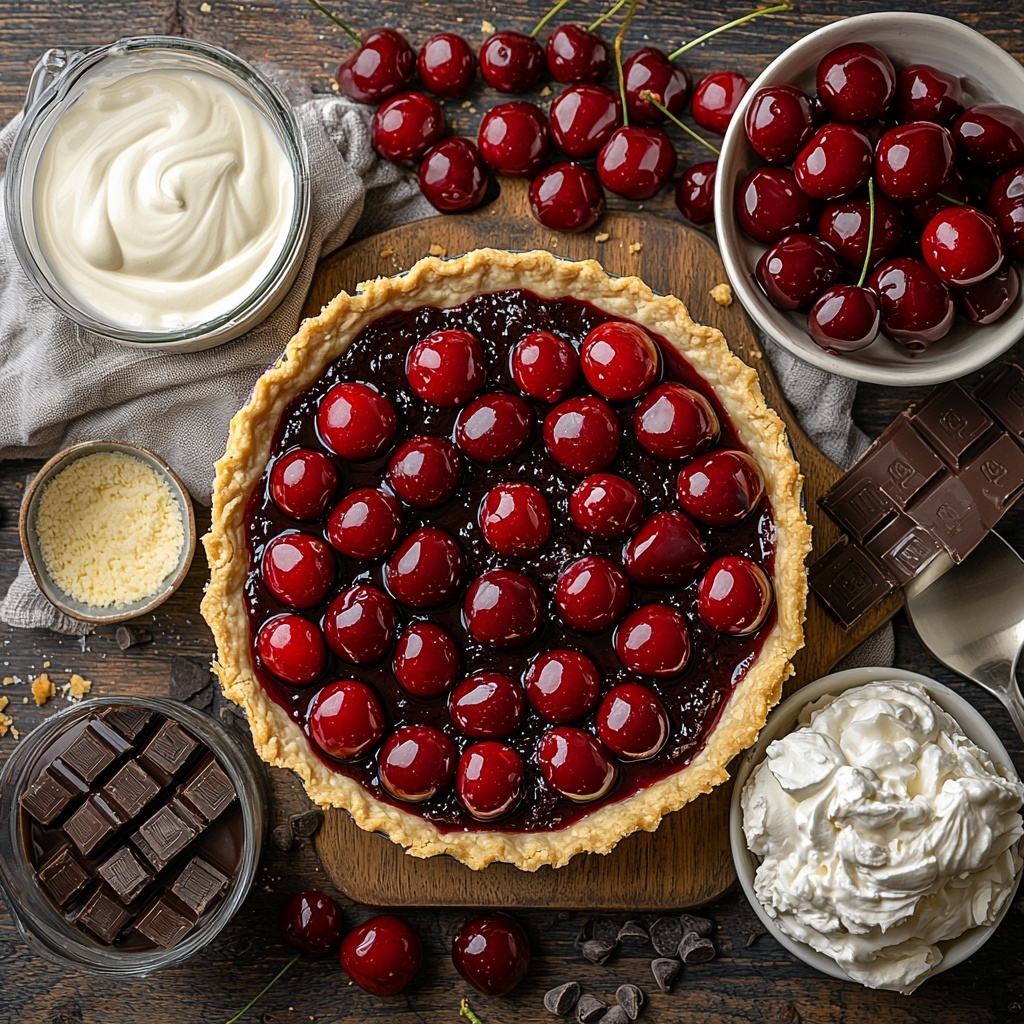
If you have a serious weakness for luscious desserts that feel like a little slice of heaven, let me introduce you to this Indulgent No-Bake Chocolate Cherry Cream Pie Recipe. It’s everything rich and creamy with bursts of cherry sweetness nestled inside a crisp, buttery crust. The best part is, no oven time is needed for assembly, making it a perfect showstopper for those moments when you want something special without the fuss. Trust me, once you dive into this pie, you’ll find yourself craving it again and again!
Ingredients You’ll Need
Gathering the right ingredients sets the stage for this pie’s wildly delicious layers, from silky cream cheese to bright cherry fillings. Each component plays a vital role in balancing taste, texture, and color — creating a dessert that looks as stunning as it tastes.
- Cherry Pie Filling: Use canned for convenience and a vibrant cherry flavor base.
- Cream Cheese (8 oz): Softened for smooth mixing, it brings a creamy tang to the chocolate mousse.
- Instant Chocolate Pudding Mix (1 package): Dark chocolate variety packs intense cocoa flavor that sets quickly with milk.
- Cold Milk (2 cups): Whole milk works best to activate the pudding’s richness and texture.
- Whipped Topping (8 oz): Store-bought or homemade adds light, fluffy creaminess for the perfect finish.
- Mini Chocolate Chips (optional): Adds delightful texture and extra bursts of chocolate crunch.
- Maraschino Cherries: For garnish, they add a bright jewel-like pop and inviting aroma.
- Pre-Baked 9-inch Pie Crust: Your favorite buttery crust that’s golden and firm serves as a superb base.
How to Make Indulgent No-Bake Chocolate Cherry Cream Pie Recipe
Step 1: Prepare the Crust
Begin by baking your 9-inch pie crust until it’s golden and crisp—this forms the perfect sturdy foundation that contrasts beautifully with the creamy layers. Once baked, set it aside on a wire rack to cool completely, ensuring you won’t melt the filling layers later on.
Step 2: Spread the Cherry Layer
Next, spoon the cherry pie filling evenly across the bottom of your cooled crust. This layer is not only visually striking but packs a juicy, tart punch that brightens the rich chocolate and cream cheeses above. Make sure to spread it out nicely so every bite is loaded with that delicious cherry goodness.
Step 3: Mix the Chocolate Mousse
Beat your softened cream cheese until luxuriously smooth, then whisk the instant chocolate pudding mix with cold milk until thick and indulgent. Folding these together creates a luscious mousse that tastes like a chocolate dream — smooth, silky, and ready to be spread over the cherries.
Step 4: Layer the Chocolate Mixture
Carefully spoon the chocolate mousse over your cherry base, spreading it evenly so the layers beautifully stack. This part is what makes the Indulgent No-Bake Chocolate Cherry Cream Pie Recipe so special, melding the tartness of cherries with deep, creamy chocolate in every forkful.
Step 5: Top with Whipped Cream
The final creamy layer comes from spreading your whipped topping gently over the mousse. This fluffy cap softens each bite and balances the richness with lightness, giving your pie a pretty, inviting surface that’s just begging to be decorated.
Step 6: Garnish Beautifully
Sprinkle mini chocolate chips over the whipped topping for texture and bursts of chocolate flavor. Then arrange maraschino cherries in an eye-catching pattern — these garnishes make the pie look irresistible, bringing color and charm that highlight the decadent layers beneath.
Step 7: Chill to Set
Place your fully assembled pie in the refrigerator for at least 3 hours. This chilling step is crucial to let the mousse set perfectly and the flavors meld together into the smooth, dreamy dessert that makes this Indulgent No-Bake Chocolate Cherry Cream Pie Recipe such a crowd-pleaser.
Step 8: Serve with Style
When ready, slice with a hot knife for clean, elegant cuts and serve the pie cold. Whether at a celebration or a cozy night in, each forkful will deliver a gorgeous combination of creamy chocolate, lively cherries, and crisp crust.
How to Serve Indulgent No-Bake Chocolate Cherry Cream Pie Recipe
Garnishes
A few fresh maraschino cherries or a light dusting of cocoa powder on top adds a touch of elegance and intensifies the chocolate notes. For an extra flourish, a sprig of fresh mint or a drizzle of chocolate sauce can beautifully elevate presentation without overwhelming the harmonious flavors.
Side Dishes
This pie pairs wonderfully with a simple scoop of vanilla ice cream or a dollop of lightly whipped cream. A cup of bold coffee or dark roasted tea also complements the chocolate cherry richness, providing a delightful balance of bitter and sweet to round out the indulgence.
Creative Ways to Present
Try serving individual portions in clear glass cups or meshed parfait jars, layering cherries, mousse, and whipped topping for a stunning visual effect. Alternatively, top slices with edible gold leaf or chocolate shavings when entertaining to impress your guests with a luxurious twist on this classic dessert.
Make Ahead and Storage
Storing Leftovers
Keep any leftover pie covered tightly with plastic wrap or in an airtight container inside the refrigerator. It will stay fresh and creamy for 3 to 4 days, giving you the chance to savor this Indulgent No-Bake Chocolate Cherry Cream Pie Recipe across several sweet occasions.
Freezing
You can freeze slices individually wrapped in plastic wrap and placed in a freezer-safe bag. When thawed overnight in the refrigerator, the texture remains surprisingly good, allowing you to enjoy this dessert anytime — just avoid refreezing.
Reheating
This pie is best served cold, so no reheating is necessary. If you want to soften the chocolate mousse slightly, simply let a refrigerated slice sit at room temperature for 10 to 15 minutes before serving to bring out every flavor nuance.
FAQs
Can I use a store-bought pie crust for this recipe?
Absolutely! Using a store-bought pre-baked crust saves time and works perfectly, as long as it’s fully cooled before assembling your pie layers.
Is it possible to make this pie dairy-free?
You can substitute dairy ingredients like cream cheese and milk with plant-based alternatives such as vegan cream cheese and almond milk, but the texture might vary slightly from the original creamy richness.
How long should I chill the pie before serving?
Chilling for at least 3 hours is ideal to let the chocolate mousse set properly and allow the flavors to meld beautifully.
Can I add nuts or other toppings to this pie?
Yes! Chopped toasted almonds or pecans add a wonderful crunch that pairs well with the creamy layers, just sprinkle them on top along with the cherries and chocolate chips.
What’s the best way to slice this no-bake pie neatly?
Run a sharp knife under hot water, wipe it dry, and then slice carefully; heating the knife between cuts helps you get smooth, clean slices every time.
Final Thoughts
There you have it — a truly irresistible Indulgent No-Bake Chocolate Cherry Cream Pie Recipe that’s easy to make yet impressive enough for any dessert table. It’s perfect for sharing with family, impressing friends, or simply indulging your chocolate cherry cravings. Once you try it, I’m sure it will become one of your go-to favorites, too!
Print
Indulgent No-Bake Chocolate Cherry Cream Pie Recipe
- Prep Time: 20 minutes
- Cook Time: 0 minutes
- Total Time: 3 hours 20 minutes
- Yield: 8 servings
- Category: Dessert
- Method: No-Cook
- Cuisine: American
Description
This Indulgent Chocolate Cherry Cream Pie is a luscious no-bake dessert combining sweet cherry pie filling, creamy chocolate mousse made from instant pudding and cream cheese, topped with whipped cream and garnished with chocolate chips and maraschino cherries. Perfectly chilled, it offers a rich, smooth texture with fruity bursts, ideal for any occasion requiring a quick yet impressive treat.
Ingredients
Pie Base
- 1 9-inch Pre-Baked Pie Crust
Cherry Layer
- 1 can Cherry Pie Filling
Chocolate Mousse
- 8 oz Cream Cheese, softened
- 1 pkg Instant Chocolate Pudding Mix (dark chocolate)
- 2 cups Cold Whole Milk
Whipped Topping & Garnishes
- 8 oz Whipped Topping (store-bought or homemade)
- Mini Chocolate Chips (optional)
- Maraschino Cherries (for garnish)
Instructions
- Prepare the Crust: If not using a store-bought pre-baked crust, bake your 9-inch pie crust following package instructions or your preferred recipe until golden and firm. Let it cool completely on a wire rack before assembling.
- Spread the Cherry Layer: Spoon the cherry pie filling evenly over the cooled pie crust, ensuring complete coverage of the base for a fruity foundation.
- Mix the Chocolate Mousse: Beat the softened cream cheese in a mixing bowl until smooth and creamy. In a separate bowl, whisk together the instant chocolate pudding mix and cold whole milk until thickened. Then gently fold the pudding mixture into the cream cheese until fully combined, creating a light and fluffy chocolate mousse.
- Layer the Chocolate Mixture: Spoon the prepared chocolate mousse evenly over the cherry layer in the pie crust and smooth the top with a spatula for an even surface.
- Top with Whipped Cream: Spread the whipped topping over the chocolate mousse layer, smoothing it out to create a creamy, inviting finish.
- Garnish Beautifully: Sprinkle mini chocolate chips over the whipped topping for texture, and arrange maraschino cherries on top for a pop of color and extra sweetness.
- Chill to Set: Refrigerate the fully assembled pie for at least 3 hours to allow the layers to set properly and meld flavors.
- Serve with Style: To serve, run a hot knife along the edges of the pie slices and cut carefully. Serve cold to enjoy the creamy, fruity, and chocolatey flavors in every bite.
Notes
- Use whole milk for best pudding consistency and mousse texture.
- Ensure cream cheese is softened to avoid lumps in the mousse.
- For a deeper chocolate flavor, choose dark chocolate instant pudding.
- The pie crust must be fully cooled before assembly to prevent sogginess.
- Refrigeration time is crucial for the pie to set — do not skip chilling.
- Optional mini chocolate chips add delightful crunch but can be omitted if preferred.
- To easily slice, dip the knife in hot water and wipe dry between cuts.


