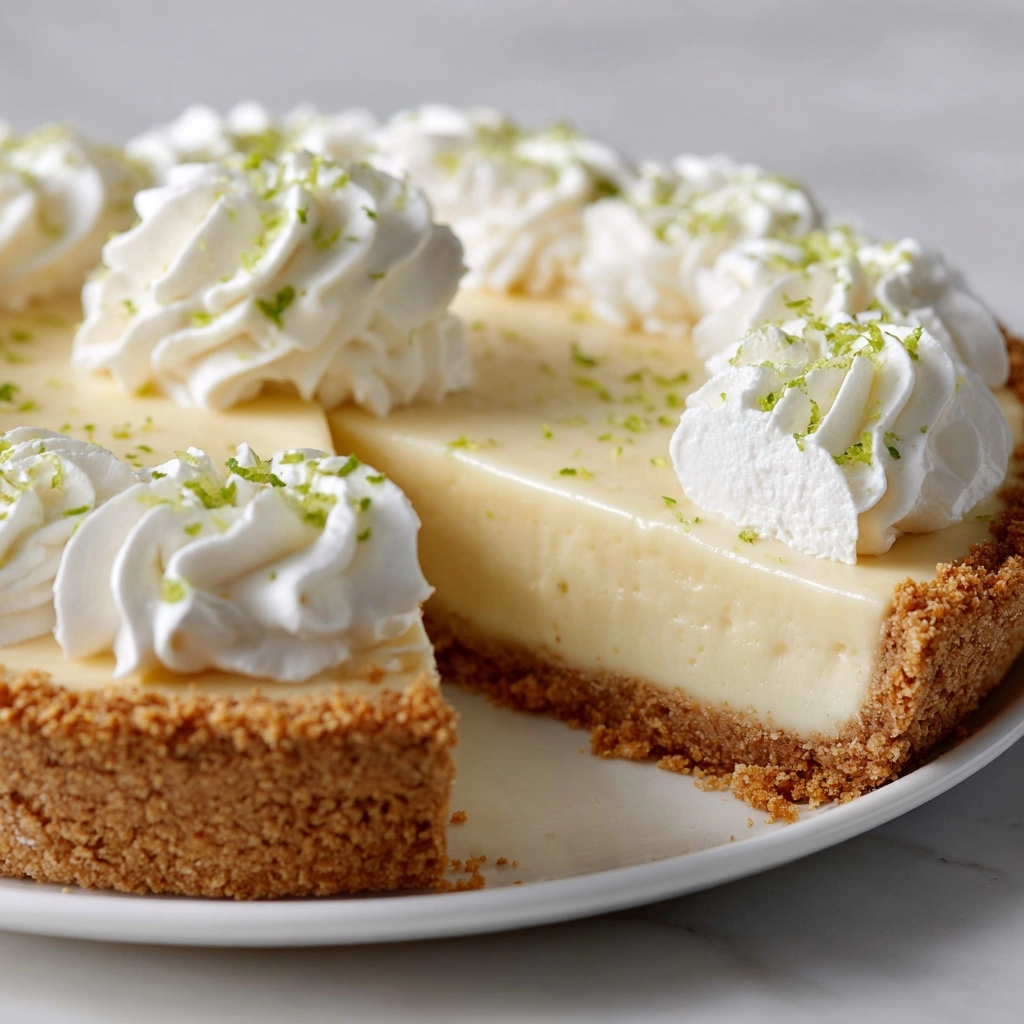
If you’re on the hunt for a showstopper dessert that’s delightfully refreshing, vibrant, and bursting with tangy citrus flavor, look no further than Key Lime Pie. This classic pie combines a crunchy graham cracker crust, a lusciously creamy filling, and a cloud of sweet whipped cream—all tied together with the unmistakable zing of key lime juice. Whether you’re indulging on a sun-soaked afternoon or capping off a special meal, this Key Lime Pie promises a taste of pure sunshine in every bite.

Ingredients You’ll Need
Gathering your ingredients for Key Lime Pie is wonderfully straightforward—each component has a starring role, contributing to the unique flavor, texture, and personality of this beloved dessert. From the crust to the dreamy whipped cream topping, every ingredient pulls its weight to deliver the ultimate treat.
- Graham cracker crumbs: These create the signature toasty, buttery crust that’s the perfect crunchy baseline for the creamy filling.
- Granulated sugar: Adds a touch of sweetness to the crust while helping it hold together beautifully.
- Unsalted butter (melted): Binds the crust and imparts a rich, golden flavor.
- Egg yolks: Lend a silkiness and help set the filling to that just-right custardy texture.
- Lime zest: Brings an extra punch of citrus aroma and color, making the filling even more vibrant.
- Key lime juice (fresh or bottled): Provides the iconic tartness and sharp flavor that defines Key Lime Pie—bottled key lime juice keeps things quick and consistent.
- Sweetened condensed milk: Creates a creamy, well-sweetened filling and balances the lime’s tang.
- Heavy whipping cream: Whipped into fluffy topping for a cool, smooth counterpoint to the pie’s acidity.
- Powdered sugar: Sweetens and stabilizes the whipped cream so it holds its pillowy soft peaks.
- Vanilla extract: Adds warmth and depth to the whipped cream, rounding out each slice with a mellow richness.
How to Make Key Lime Pie
Step 1: Prepare the Graham Cracker Crust
Begin by preheating your oven to 350°F (175°C). In a medium bowl, combine graham cracker crumbs, granulated sugar, and melted unsalted butter. Mix everything together until it resembles wet sand—this ensures the crust will hold together nicely. Tightly press the mixture across the bottom and up the sides of a 9-inch pie dish. Pop it in the oven for about 8 minutes, just until lightly golden and fragrant. Set the crust aside to cool while you move on to the filling.
Step 2: Mix the Key Lime Filling
In a large mixing bowl, whisk together the four egg yolks and lime zest until slightly thick and pale. This not only combines the ingredients but also helps the zest release its essential citrus oils, which means maximum lime flavor. Whisk in the sweetened condensed milk until your mixture is smooth, then stir in the key lime juice. The filling will be creamy and golden, with that irresistible citrus aroma wafting up. Pour it into your cooled crust, using a spatula to spread it evenly.
Step 3: Bake the Pie
With your filling nestled in the crust, bake the pie for 15 minutes. You’ll know it’s ready when the edges are set and the center is still just slightly jiggly—a gentle wobble is perfect and ensures a smooth custard. Allow the pie to cool at room temperature for about half an hour before moving it to the fridge for a full chill. Let it refrigerate for at least 3 hours so it sets up beautifully.
Step 4: Whip the Cream
Right before serving, make the whipped cream. In a cold mixing bowl, combine heavy whipping cream, powdered sugar, and vanilla extract. Whisk or use a mixer until soft peaks form. This sweet, billowy topping contrasts beautifully with the tartness of the pie. You can either spread the whipped cream over the top or use a piping bag for a decorative flourish—it’s up to you!
Step 5: Assemble and Serve Your Key Lime Pie
Once your Key Lime Pie is completely chilled, generously spoon or pipe the whipped cream over the surface. If you’re feeling fancy, add a little extra lime zest or a few thin lime slices on top. The pie is now ready for its grand entrance at the table—slice, serve, and watch everyone’s faces light up!
How to Serve Key Lime Pie

Garnishes
A pie as bright and beautiful as Key Lime Pie deserves a bit of flair. Try garnishing with extra lime zest, slices of fresh key lime, or even some delicate twists of lime peel. These little touches not only make your pie look stunning, but amplify that zesty, citrusy aroma with each forkful.
Side Dishes
When serving Key Lime Pie, keep your sides light and refreshing. A bowl of fresh berries, a scoop of coconut sorbet, or some cold-brewed iced tea are wonderful pairings. These accompaniments echo the pie’s breezy vibe and ensure no one is overwhelmed after a big meal.
Creative Ways to Present
For a fun twist, serve Key Lime Pie in individual jars or parfait glasses—layering crust, citrus filling, and whipped cream for a modern look. Or, create cute mini pies in muffin tins for parties or get-togethers. However you serve it, this pie’s cheerful color and creamy layers speak for themselves!
Make Ahead and Storage
Storing Leftovers
Leftover Key Lime Pie keeps wonderfully in the fridge. Simply cover the dish tightly with plastic wrap or aluminum foil to prevent it from picking up any fridge smells. The texture stays lovely for up to three days, making it perfect for grabbing a slice whenever you need a zesty treat.
Freezing
If you’d like to save your Key Lime Pie for a later date, freezing is a great option. Just make sure the pie is fully set and chilled first. Wrap it carefully in multiple layers of plastic wrap and foil, then freeze for up to one month. Thaw the pie overnight in the refrigerator before serving; add the whipped cream garnish after thawing for best texture.
Reheating
Key Lime Pie is meant to be enjoyed cold or slightly chilled; reheating isn’t necessary and can actually affect the creamy texture. If serving after refrigeration or freezing, let it sit at room temperature for 10 to 15 minutes to take the chill off, then add the whipped topping and dig in!
FAQs
Can I use regular limes instead of key limes?
Absolutely! While key limes offer a uniquely floral and strong tartness, Persian limes (the regular kind) can step in if you can’t find key limes or bottled key lime juice. The flavor will be slightly different, but you’ll still have a delicious, refreshing pie.
Do I need to bake the crust?
Baking the graham cracker crust is optional but highly recommended. A brief stint in the oven helps firm it up and brings out a toasty, buttery flavor that’s the perfect counterpoint to the creamy, citrusy filling in Key Lime Pie.
Why does the filling look slightly jiggly when I take it out of the oven?
That slight jiggle in the center just means the custard filling has set perfectly. As the Key Lime Pie cools and chills in the fridge, it will firm up completely, resulting in silky, sliceable layers.
Can I make Key Lime Pie in advance?
Yes, in fact, Key Lime Pie actually benefits from being made ahead. Chilling overnight helps the flavors meld and makes for prettier slices. Add the whipped cream topping just before serving for the best results.
What’s the best way to whip the cream for the topping?
Start with very cold cream and a chilled bowl. Use a hand mixer or stand mixer on medium speed, adding in powdered sugar and vanilla until soft peaks form. Don’t over-whip—the cream should be soft, fluffy, and easy to spread or pipe onto your pie.
Final Thoughts
If you’re ready to bring some sweet sunshine into your kitchen, give this homemade Key Lime Pie a try. It’s the kind of dessert that instantly brightens any day, and you’re sure to fall in love with its simple preparation, stunning good looks, and unforgettable flavor. Treat yourself and your loved ones to a slice—you’ll be glad you did!