If you have a serious sweet tooth and a love for all things creamy and spiced, then you are absolutely going to adore this No-Bake Lotus Biscoff Cheesecake Recipe. It’s a luscious treat that beautifully combines the famous caramelized, slightly spiced flavor of Lotus Biscoff cookies with a rich and velvety cream cheese filling. Best of all? This dessert comes together without turning on the oven, making it a perfect choice for any occasion when you want something impressive yet refreshingly simple. Get ready to dive into endless layers of flavor and texture in one irresistible slice.
Ingredients You’ll Need
This No-Bake Lotus Biscoff Cheesecake Recipe calls for a handful of straightforward, pantry-friendly ingredients that, when combined, create such an indulgent masterpiece. Each component plays its own crucial role, delivering the perfect balance of flavor, texture, and visual appeal.
- Lotus Biscoff cookies: These iconic cookies form the crumbly, fragrant base that lends a uniquely spiced background to the cheesecake.
- Melted butter: Acts as the binder for the cookie crust, ensuring it stays firm yet buttery in every bite.
- Cream cheese: The creamy heart of the cheesecake, it’s essential to beat it smoothly for that perfect silky mouthfeel.
- Powdered sugar: Sweetens the cheesecake filling while helping it stay smooth without any grit.
- Vanilla extract: Adds warmth and depth to the cream cheese mixture, subtly enhancing all the other flavors.
- Heavy whipping cream: Whipped to stiff peaks, it lightens the filling, making every forkful heavenly and airy.
- Lotus Biscoff spread: Infuses the filling with that signature caramel spice note, elevating the cheesecake to new heights.
How to Make No-Bake Lotus Biscoff Cheesecake Recipe
Step 1: Create the Cookie Base
Start by crushing the Lotus Biscoff cookies into fine crumbs using a food processor or placing them in a sealed plastic bag and pounding them until they resemble sandy granules. This crumbly texture is crucial for giving the crust its nostalgic crunch paired with that unmistakable Biscoff spice profile.
Step 2: Combine Crumbs and Butter
Transfer your cookie crumbs to a mixing bowl and pour in the melted butter. Stir everything well until the mixture achieves a wet, sandy feel, which will help the crust bind beautifully when pressed into the pan.
Step 3: Press the Crust
Press this buttery crumb blend firmly into the base of an 8-inch springform pan. Use the back of a spoon or your fingers to create an even, compact foundation. Pop it in the fridge to chill and set while you focus on the heavenly filling.
Step 4: Whip the Cream Cheese Smooth
In a clean bowl, beat the cream cheese with a mixer on medium speed until perfectly smooth and lump-free. This step ensures your cheesecake filling will be luxuriously creamy without any unwanted texture interruptions.
Step 5: Add Sweetness
Sprinkle in the powdered sugar and continue beating until fully incorporated and fluffy. This is where the filling starts to take shape as a sweet, dreamy cloud of flavor.
Step 6: Flavor with Vanilla
Beat in the vanilla extract to round out the cheesecake’s flavor with a subtle, comforting warmth that partners wonderfully with the cookie spices.
Step 7: Whip the Cream
In a separate bowl, whip the heavy cream on high speed until stiff peaks form. This luscious whipped cream will lighten your filling, balancing richness with a perfect fluff.
Step 8: Fold Cream Into Cream Cheese
Gently fold the whipped cream into your cream cheese mixture, using a spatula to maintain an airy texture. Take care to avoid over-mixing so the filling stays light and soft.
Step 9: Incorporate Lotus Biscoff Spread
Fold the luscious Biscoff spread into the filling evenly. This step brings that signature caramelized, spiced character to the cheesecake in every creamy bite.
Step 10: Assemble the Cheesecake
Retrieve the chilled cookie crust and spread the cheesecake filling evenly over it. Smooth the top with a spatula to create an inviting, polished surface.
Step 11: Chill to Set
Refrigerate the cheesecake for at least 4 hours, preferably overnight, giving it time to firm up and for all those incredible flavors to meld together into cheesecake perfection.
Step 12: Remove from Pan and Prepare to Serve
Carefully release the springform pan and transfer your cheesecake to a serving platter, ready for those finishing touches.
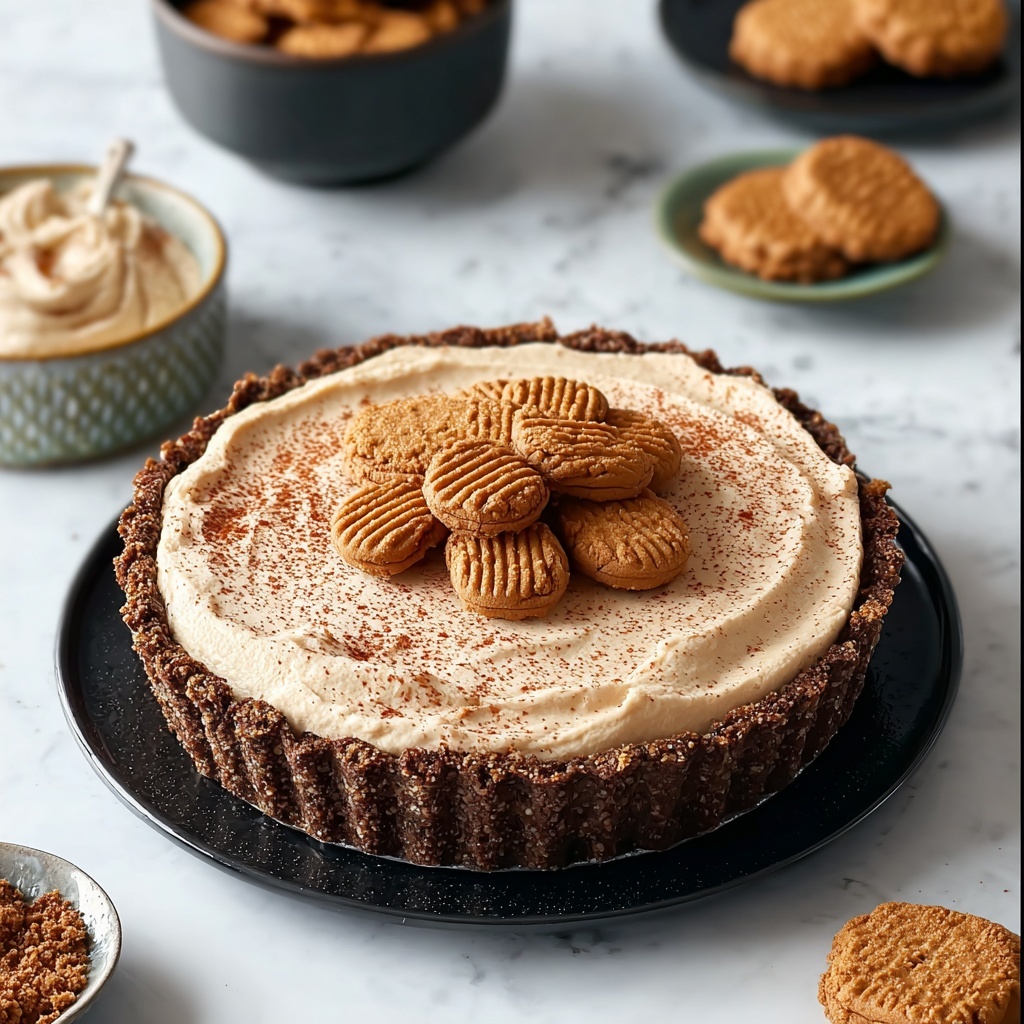
Step 13: Add Final Touches
Garnish the cheesecake with extra crushed Lotus Biscoff cookies or drizzle with more Biscoff spread for an inviting, decorative finish.
Step 14: Serve and Enjoy
Slice up your cheesecake and serve chilled to enjoy the magical combination of crunchy spiced base and creamy, dreamy filling.
How to Serve No-Bake Lotus Biscoff Cheesecake Recipe
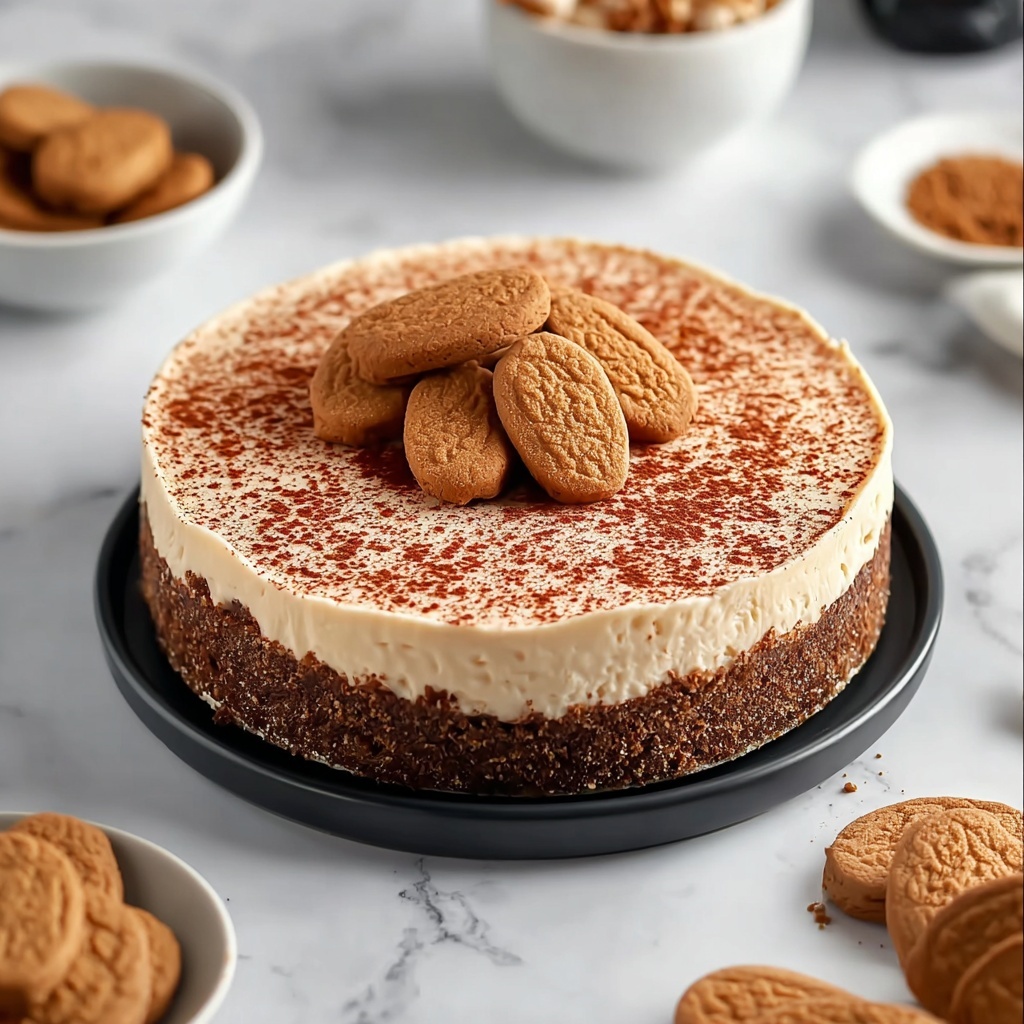
Garnishes
The best way to dress up this No-Bake Lotus Biscoff Cheesecake Recipe is with generous sprinkles of crushed Lotus Biscoff cookies on top. A drizzle of the Biscoff spread is equally delightful, adding an extra visual pop and that caramelized sweetness that makes every bite unforgettable.
Side Dishes
Serve this cheesecake alongside fresh berries like raspberries or sliced strawberries, which add a subtle tart contrast to the sweet richness. A dollop of whipped cream or a scoop of vanilla ice cream also pairs beautifully to create a truly indulgent dessert experience.
Creative Ways to Present
For a special touch, try layering the cheesecake filling and cookie crumbs in individual clear glasses for stunning mini parfaits. You could also experiment with adding a sprinkle of sea salt on top to balance the sweetness or pairing each slice with a warm cup of spiced chai tea to echo the cozy flavors perfectly.
Make Ahead and Storage
Storing Leftovers
This cheesecake will keep wonderfully in the fridge covered tightly with plastic wrap or stored in an airtight container for up to 3-4 days, maintaining its luscious texture and flavor without drying out.
Freezing
You can freeze the No-Bake Lotus Biscoff Cheesecake Recipe if needed. Wrap it securely in plastic wrap and then aluminum foil to prevent freezer burn. It will keep well for up to 1 month. When ready, thaw overnight in the fridge before serving to preserve its creamy consistency.
Reheating
Since this is a no-bake, chilled cheesecake, it’s best enjoyed cold. Avoid reheating to keep the texture intact. Simply let refrigerated cheesecake sit at room temperature for about 10-15 minutes before serving if you prefer a slightly softer slice.
FAQs
Can I use a different type of cookie for the crust?
While Lotus Biscoff cookies are integral to this recipe’s unique flavor, you can substitute with other spiced cookies, graham crackers, or digestive biscuits if needed. However, this will change the signature taste slightly.
Is it possible to make this cheesecake vegan?
To make a vegan version, swap the cream cheese and heavy cream for dairy-free alternatives like vegan cream cheese and coconut cream. Be mindful that texture and flavor might be subtly different but still delicious!
How long does it take to set properly?
Chilling the cheesecake for at least 4 hours is necessary, but for the best texture and flavor blend, overnight refrigeration is highly recommended.
Can I double the recipe for a larger cheesecake?
Yes! Just double all the ingredients and use a larger pan or two smaller pans. Adjust chilling time accordingly, ensuring it’s completely set before serving.
What if my cream cheese has lumps after beating?
To avoid lumps, make sure the cream cheese is softened to room temperature before mixing. If lumps remain, keep beating or use a hand blender to get a perfectly smooth texture.
Final Thoughts
This No-Bake Lotus Biscoff Cheesecake Recipe is one of those magical dessert moments that feels both indulgent and surprisingly effortless. It’s perfect for sharing with friends, impressing at gatherings, or simply treating yourself to something extraordinary. Once you get a taste, you’ll see why this no-bake beauty becomes an instant favorite – so don’t hesitate to dive in and make it your own!