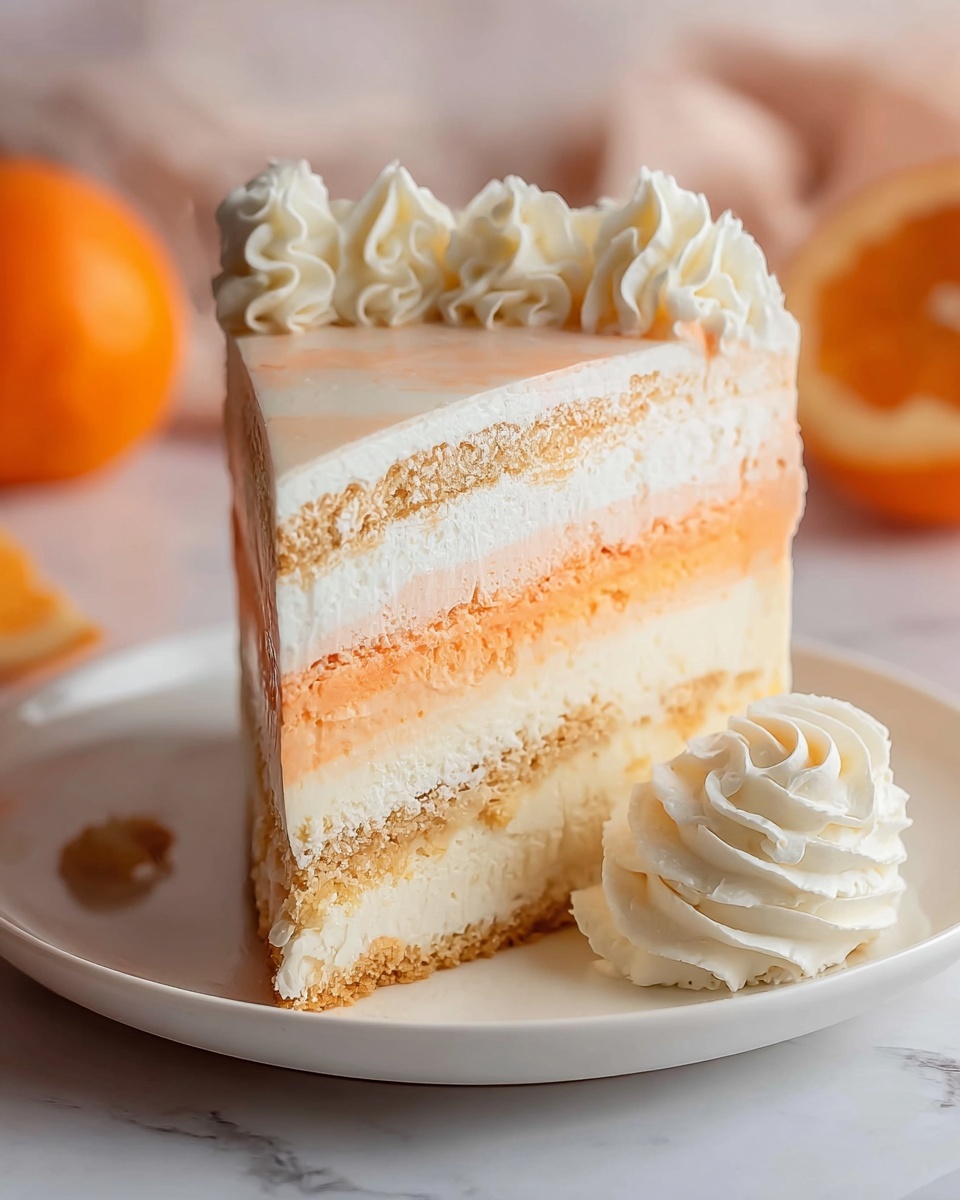
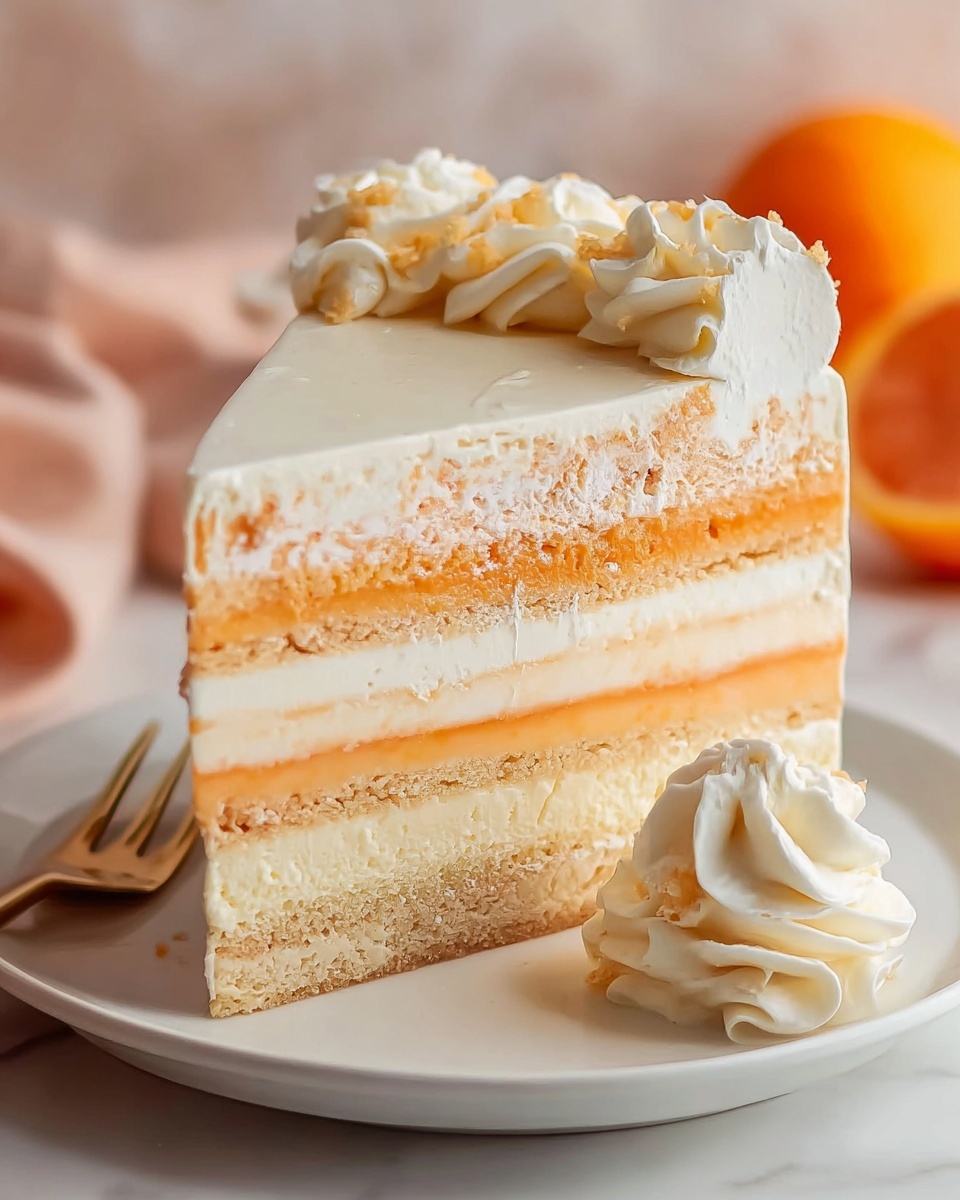
If you’re craving a dessert that captures the nostalgic, tangy, and creamy joy of an orange creamsicle but in a luscious cheesecake form, then this No Bake Orange Creamsicle Cheesecake Recipe is your new best friend. It’s a dreamy combination of zesty orange, velvety cream cheese, and a delightfully crunchy vanilla wafer crust—all coming together without ever turning on the oven. This cheesecake is not only a treat for your taste buds but also perfect for warm days when you want something cool, refreshing, and utterly indulgent with minimal effort.
Ingredients You’ll Need
This cheesecake comes together with a handful of simple, everyday ingredients that each play a vital role: from that perfectly crunchy crust to the light, fluffy cheesecake filling with that unmistakable orange punch. Here’s everything you’ll want on hand before starting your No Bake Orange Creamsicle Cheesecake Recipe.
- Vanilla Wafers (11 ounces): These crushed cookies form a buttery, crisp crust that perfectly complements the creamy filling.
- Granulated Sugar (3 tablespoons + ¾ cup): Balances sweetness throughout both crust and cheesecake layers.
- Unsalted Butter (8 tablespoons, melted): Binds the crust and adds richness without overpowering flavors.
- Heavy Cream (2 cups): Whipped to snowy peaks for lightness and smoothness in the filling.
- Clear Vanilla Flavoring (1 teaspoon total): Brings subtle warmth and depth without changing color.
- Powdered Sugar (½ cup + 1 tablespoon): Whisked into the cream to add smooth sweetness without graininess.
- Boiling Water (¾ cup): Necessary to dissolve the orange-flavored jello for that signature creamsicle tang.
- Orange-Flavored Jello (3 ounces): Provides bright citrus flavor and helps set the no-bake filling.
- Orange Zest (1 tablespoon): Infuses fresh, fragrant orange oils for authentic creamsicle notes.
- Cream Cheese (16 ounces, softened): The star of the filling, adding creamy tang and rich texture.
How to Make No Bake Orange Creamsicle Cheesecake Recipe
Step 1: Prepare the Crust
Start by spraying a 9-inch springform pan with nonstick spray for easy removal later. In a bowl, combine your finely crushed vanilla wafers, 3 tablespoons of sugar, and melted butter. This mixture needs to be pressed firmly and evenly into the bottom of your pan — this forms the perfect crunchy base that pairs beautifully with the creamy filling. Pop it into the freezer so it can set and hold its shape.
Step 2: Whip the Cream
Using a mixer, whip the heavy cream together with ½ teaspoon of vanilla and ½ cup powdered sugar until you see those stiff, soft peaks form. This light and fluffy whipped cream is crucial for giving the cheesecake its airy texture. Divide this luscious cream into two portions to use later in separate mixtures.
Step 3: Make the Orange Jello Mixture
In a heatproof bowl, dissolve the orange-flavored jello and orange zest into the boiling water. This blend needs to cool completely before you combine it with the whipped cream — this step ensures your filling sets properly without melting your cream.
Step 4: Blend the First Filling Layer
Gently fold half of one whipped cream portion into your cooled jello mixture. Reserve about ½ cup of this orange cream for swirling later. Handling the mixture carefully keeps the texture light and airy so the cheesecake layers are delightful.
Step 5: Prepare the Cream Cheese Mixture
Beat the softened cream cheese until perfectly smooth, then add the ¾ cup sugar and remaining vanilla. Mix until creamy and lump-free. Next, fold in half of your remaining whipped cream portion, again reserving about ¾ cup of the cheesecake mixture for swirling. This thick, tangy layer forms the heart of your cheesecake.
Step 6: Assemble the Cheesecake Layers
Spread the cream cheese filling evenly over your frozen crust, leaving a bit of space to add swirls. Dollop the reserved orange cream atop in random spots and swirl gently with the tip of a fork to create a lovely marbling effect. Smooth the remaining cheesecake mixture on top of the swirls, then finish with the last layer of orange cream. The dreamy layers with their vibrant orange swirls promise both visual and flavor excitement.
Step 7: Chill to Set
Cover your cheesecake and refrigerate for at least 6 hours, ideally overnight, to allow the layers to set completely. This patient step is where all the creamy textures meld into the perfect no bake masterpiece.
Step 8: Serve with Flair
Before serving, run a thin knife around the sides of your springform pan to loosen the edges, then carefully remove the pan sides. Your cheesecake should come out perfectly intact, with those gorgeous orange swirls peeking through. Now it’s ready to impress!
How to Serve No Bake Orange Creamsicle Cheesecake Recipe
Garnishes
Sprinkle some extra fresh orange zest or thin orange slices on top for a bright, fresh garnish that amplifies the citrus punch. A few dollops of whipped cream or even a sprinkle of finely crushed vanilla wafers add texture and a touch of elegance. These little touches make every bite feel special.
Side Dishes
This cheesecake pairs wonderfully with fresh berries, especially blueberries or raspberries, to add tart contrast. A crisp fruit salad or a small bowl of tangy citrus sorbet can also balance the richness with refreshing notes, perfect if you’re serving this at a summer gathering.
Creative Ways to Present
For parties, slice and serve individual portions in clear glasses with layers of whipped cream and orange zest on top for a parfait-inspired dessert. You can also dollop some flavored whipped cream or drizzle a thin orange glaze across each slice for an elevated presentation that begs to be photographed.
Make Ahead and Storage
Storing Leftovers
Keep leftover cheesecake in an airtight container in the refrigerator where it will stay fresh and creamy for up to 4 days. The no bake nature means it keeps its texture beautifully without drying out.
Freezing
This cheesecake freezes very well if wrapped tightly in plastic wrap and aluminum foil to protect from freezer burn. Freeze in whole or sliced portions for up to 2 months. Thaw overnight in the refrigerator before serving to maintain that perfect creamy consistency.
Reheating
Since this is a chilled dessert, reheating is not necessary or recommended. Enjoy it cold straight from the fridge or after thawing frozen portions for that refreshing, creamy experience each time.
FAQs
Can I use another type of cookie for the crust?
Absolutely! While vanilla wafers give that classic creamy vanilla crunch, graham crackers or digestive biscuits can also work wonderfully to complement the orange flavors.
Is it possible to make this cheesecake gluten-free?
Yes! Just substitute the vanilla wafers with gluten-free cookies that have a similar texture and flavor. Be sure to check that all other ingredients are gluten-free as well.
Can I use regular vanilla extract instead of clear vanilla flavoring?
You can, but keep in mind that regular vanilla extract might tint the cheesecake a light tan color. Clear vanilla is used here to keep the dessert’s bright white and orange layers visually stunning.
How long should I whip the heavy cream?
Whip the cream on high speed until you reach stiff peaks, where the cream holds its shape when the beaters are lifted. This usually takes a few minutes but watch carefully to avoid overwhipping, which can turn buttery.
Can this cheesecake be made without gelatin?
The orange-flavored jello provides both flavor and helps set the cheesecake without baking. If you want to avoid gelatin, consider using a plant-based substitute like agar-agar, but expect some changes in texture and setting time.
Final Thoughts
This No Bake Orange Creamsicle Cheesecake Recipe is truly a celebration of creamy, citrusy bliss, all wrapped up without ever firing up the oven. It’s a fantastic make-ahead dessert that looks as incredible as it tastes, perfect for summer parties or whenever you want a slice of sunshine on your plate. I encourage you to give it a whirl—once you take that first forkful, you’ll understand why it’s a favorite! Happy cheesecake making!