If you’re searching for a sweet treat that perfectly balances tartness with buttery, crunchy texture, this Raspberry Crumble Bars Recipe is going to be your new go-to dessert. Bursting with fresh raspberries nestled under a golden, oat-studded crumble, these bars combine simplicity and sophistication in every bite. Whether you’re baking for a cozy afternoon snack or a festive gathering, these Raspberry Crumble Bars Recipe will quickly become a beloved favorite thanks to their irresistible flavor and straightforward ingredients.

Ingredients You’ll Need
Gathering simple, wholesome ingredients is the secret to making these Raspberry Crumble Bars sing. Each element plays a crucial role: from the tender crust formed by oats and flour to the juicy fresh raspberries that bring brightness and that gorgeous vibrancy to your dessert.
- All-purpose flour: Provides structure and a tender crumb to the bars.
- Rolled oats: Add a hearty texture and rustic flavor that complement the raspberries perfectly.
- Granulated sugar: Sweetens both the crumb and the filling, balancing the tartness of the fruit.
- Salt: Enhances the overall flavor and balances the sweetness.
- Baking powder: Helps lighten the crumb topping for a delicate texture.
- Vanilla extract: Brings warmth and depth to the crumble base.
- Unsalted butter (cold and cubed): Creates that irresistibly flaky, buttery crust and crumb.
- Fresh raspberries: The vibrant, juicy star of the filling.
- Cornstarch: Thickens the raspberry filling so it’s perfectly luscious without being runny.
How to Make Raspberry Crumble Bars Recipe
Step 1: Prepare the Pan and Oven
Start by preheating your oven to 350°F (175°C). Line an 8×8-inch square baking pan with parchment paper, leaving enough overhang on the sides. This makes it super easy to lift the bars out when they’re ready, ensuring neat removal and clean cuts.
Step 2: Mix the Dry Ingredients
Combine the all-purpose flour, rolled oats, sugar, salt, and baking powder in a medium bowl. Stir everything together until the mixture is evenly blended. This dry mix is the foundation for your buttery crumble crust and topping.
Step 3: Incorporate the Cold Butter
Add the cold, cubed unsalted butter to the dry ingredients. Using a pastry cutter, fork, or even your fingers, work the butter into the dry mixture until it resembles coarse crumbs with pea-sized butter bits throughout. These chunks will melt during baking, creating tender pockets in the crumb.
Step 4: Add Vanilla
Pour in the vanilla extract and mix just until everything comes together. This little addition brightens the flavor beautifully and makes the crust irresistibly aromatic.
Step 5: Reserve Topping Crumbs
Set aside about 1 cup of this crumbly mixture to use later as the topping. This step ensures a thick, golden, crunchy layer on top of the raspberry filling.
Step 6: Form the Crust
Press the remaining crumb mixture evenly into the bottom of the prepared pan, compacting it firmly with your fingers or the back of a spoon. This will be the sturdy, buttery base supporting the lush raspberry filling.
Step 7: Prepare the Raspberry Filling
In a separate bowl, toss the fresh raspberries with sugar and cornstarch. The sugar sweetens while the cornstarch thickens the juices, preventing the bars from getting soggy while baking.
Step 8: Assemble the Bars
Spread the raspberry mixture evenly over the crust layer in your pan, making sure the fruit is well distributed for even bites of tart sweetness.
Step 9: Add the Crumble Topping
Sprinkle the reserved crumb mixture over the raspberries, covering the fruit layer as evenly as possible. This layer will bake into a golden, crunchy topping that contrasts beautifully with the soft filling.
Step 10: Bake to Perfection
Bake the bars for 35 to 40 minutes or until the topping turns golden brown and you see the raspberry filling bubbling around the edges. The bubbling is a good sign that the fruit is perfectly cooked and packed with flavor.
Step 11: Cool and Release
Remove the pan from the oven and let it cool on a wire rack for about 10 minutes. This helps the filling set slightly, so the bars cut cleaner.
Step 12: Lift and Cool Completely
Using the parchment paper overhang, lift the bars from the pan and place them on a wire rack to cool completely. Cooling fully ensures the bars hold their shape when sliced.
Step 13: Slice and Serve
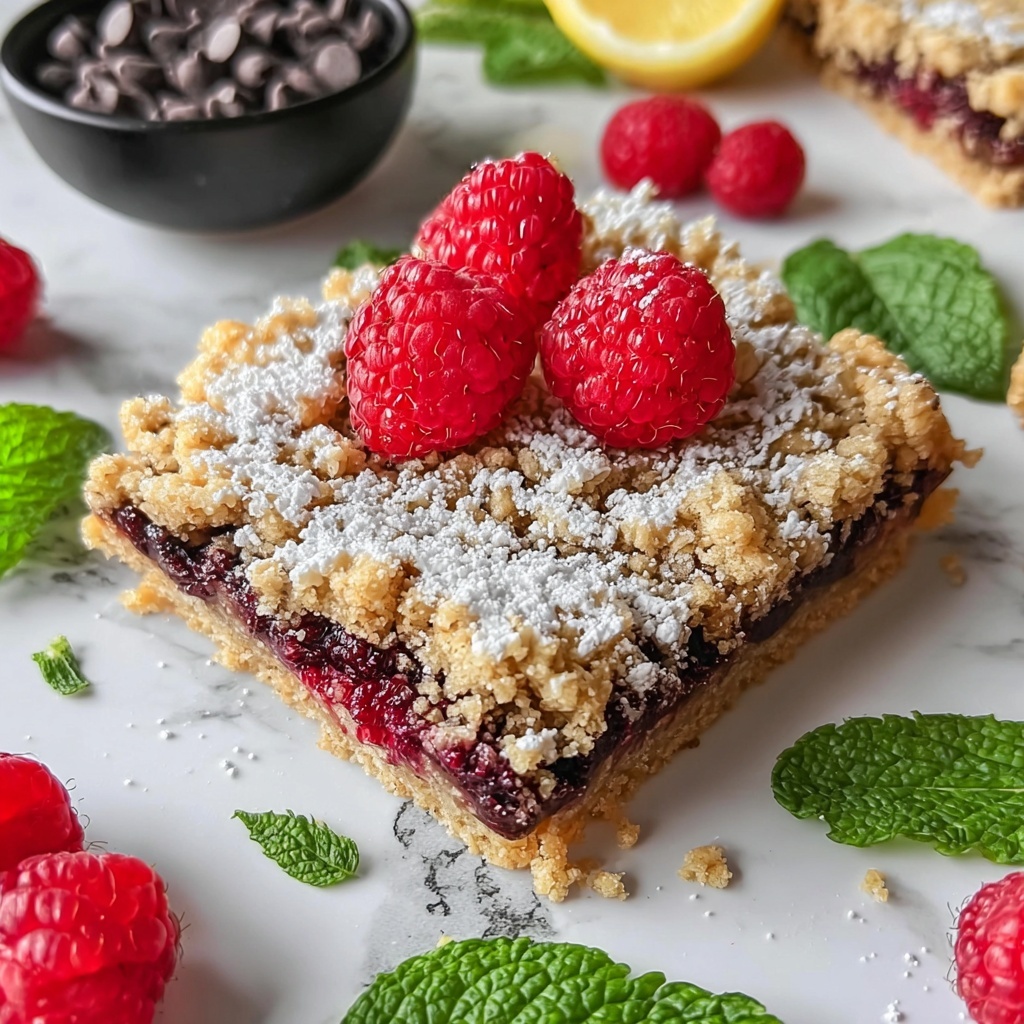
Once cooled, cut the bars into squares or rectangles. These delightful morsels are ready to enjoy, showing off that perfect balance of crumbly crust, luscious raspberry filling, and crisp topping.
How to Serve Raspberry Crumble Bars Recipe

Garnishes
A light dusting of powdered sugar adds a pretty finishing touch and a touch of extra sweetness. For an elegant spin, try a dollop of freshly whipped cream or a scoop of vanilla ice cream for a luscious contrast between warm and cold, rich and tart.
Side Dishes
These bars are delicious on their own but pair wonderfully with a simple cup of tea or freshly brewed coffee. For brunch or dessert spreads, offer alongside fresh fruit salad or creamy yogurt for a fresh, balanced plate.
Creative Ways to Present
For a charming party presentation, cut the bars into bite-sized squares and serve them on a decorative platter with fresh raspberries scattered around. Alternatively, place individual bars in mini dessert jars layered with whipped cream and mint leaves for a stunning visual and delightful taste experience.
Make Ahead and Storage
Storing Leftovers
Keep your Raspberry Crumble Bars covered in an airtight container at room temperature for up to two days to maintain their crumbly texture. For longer freshness, refrigerate them where they’ll keep well for up to a week without losing their flavor.
Freezing
You can freeze these bars by wrapping them tightly in plastic wrap and placing them in a freezer-safe container or bag. Freeze for up to 3 months. When ready to enjoy, thaw them in the fridge overnight for the best texture.
Reheating
To warm the bars, heat them gently in a preheated oven at 300°F (150°C) for about 10 minutes or until heated through. Avoid microwaving to maintain the desirable crumble texture. Pair warmed bars with a scoop of ice cream for indulgence at its finest.
FAQs
Can I use frozen raspberries for this Raspberry Crumble Bars Recipe?
Yes, frozen raspberries can be used. Just make sure to thaw and drain them well before mixing with sugar and cornstarch to avoid excess moisture that could make the bars soggy.
Is it possible to make these bars gluten-free?
Absolutely! Substitute the all-purpose flour with a gluten-free flour blend, and ensure your oats are certified gluten-free. This swap will keep the texture intact while accommodating dietary needs.
Can I substitute butter with a non-dairy alternative?
Yes, you can use cold coconut oil or a vegan butter substitute in the same amount to create a dairy-free version of these bars without compromising on that buttery crumble flavor.
How do I know when the bars are done baking?
You’ll want the crumble topping to be a deep golden brown and the raspberry filling to be bubbling around the edges. This bubbling is a clear sign that the filling has thickened properly and the bars are ready to come out.
How long do these Raspberry Crumble Bars stay fresh at room temperature?
Stored in an airtight container, they should stay fresh for about two days at room temperature. For longer storage, refrigerate to maintain freshness for up to a week.
Final Thoughts
There’s something truly special about creating homemade Raspberry Crumble Bars Recipe that transforms simple ingredients into a dessert bursting with fresh fruit flavor and crunchy, buttery goodness. Once you try these bars, they’ll become a cherished staple in your baking repertoire, impressing family and friends alike. So go ahead, bake up a batch, and relish every joyful bite!