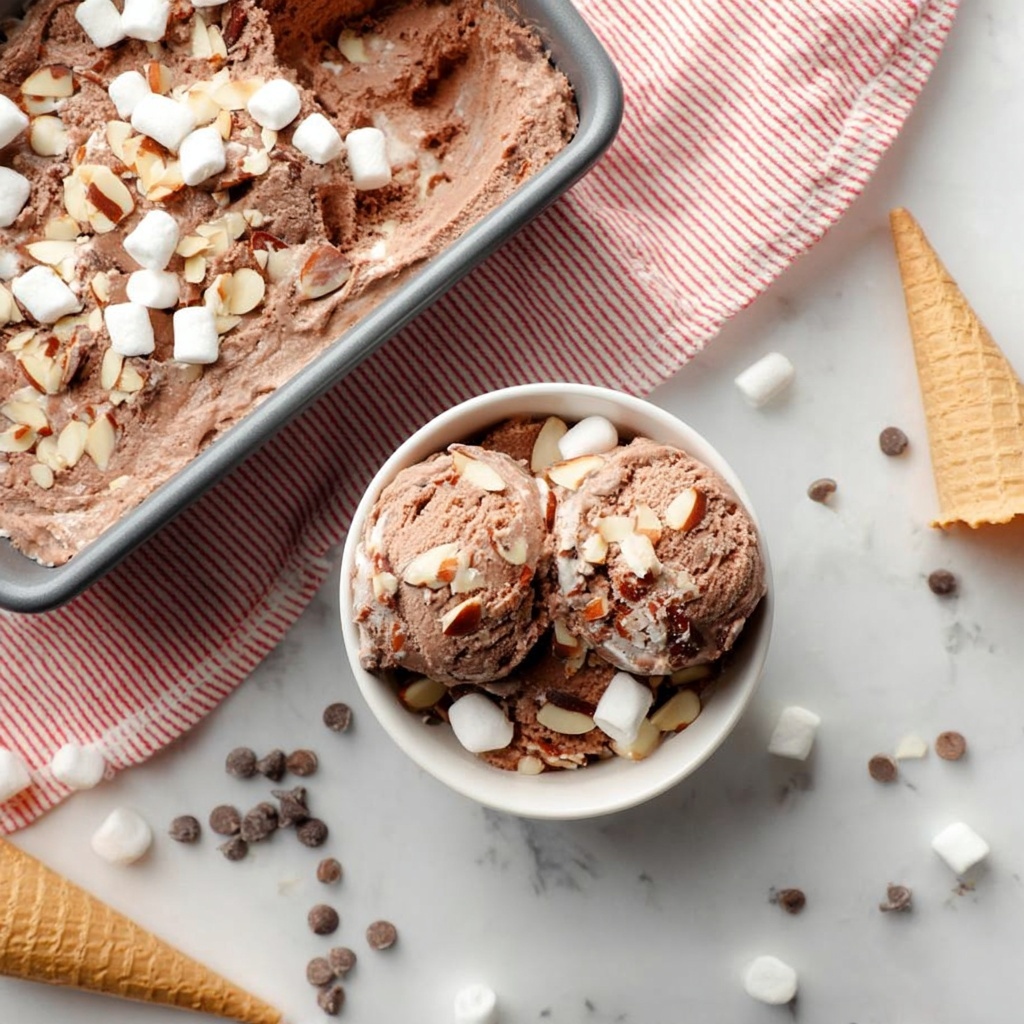
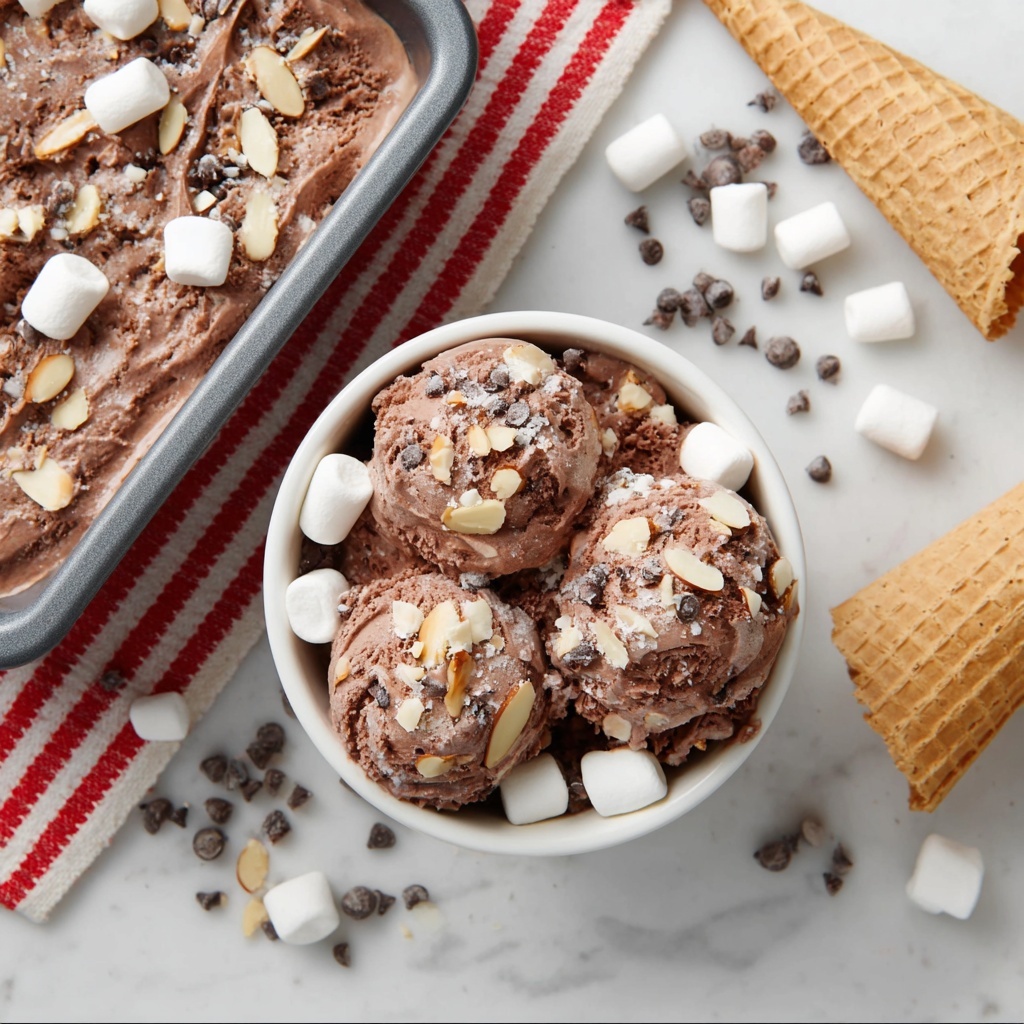
If you have a weakness for chocolate, nuts, and marshmallows all swirled together into a creamy, dreamy frozen treat, then you are in for a real delight with this Rocky Road Ice Cream Recipe. This homemade ice cream brings together the nostalgic flavors of classic rocky road candy in a smooth, luscious form that anyone can whip up with ease. Rich, chocolatey, crunchy, and oh-so-marshmallowy, this recipe truly elevates a simple ice cream into a memorable dessert experience you’ll want to make again and again.

Ingredients You’ll Need
Gathering your ingredients for this Rocky Road Ice Cream Recipe is simple, but each one plays a crucial role in building layers of texture and flavor. From the silky cream to the crunchy almonds and sweet mini marshmallows, every component is essential to creating that perfect rocky road bite.
- 2 cups heavy cream (cold): The foundation for the ice cream’s rich and creamy texture.
- 1 14 oz sweetened condensed milk: Adds natural sweetness and helps create a smooth, scoopable consistency without the need for an ice cream maker.
- 1 tsp vanilla extract: Enhances the overall flavor with a subtle fragrant warmth.
- ¼ cup cocoa powder (unsweetened): Brings a deep, chocolatey richness that balances the sweetness perfectly.
- ½ cup almonds (divided, with 1 tablespoon sliced or chopped): Provides a satisfying crunch and nutty flavor.
- 2 cups mini marshmallows (divided, 2 tablespoons reserved): Soft, chewy pockets of sweetness that melt delightfully in every bite.
- ½ cup mini chocolate chips (divided, with ½ tablespoon reserved): Little bursts of chocolate add extra indulgence throughout the ice cream.
- Ice cream cones (for serving): Optional but adds a fun, nostalgic way to enjoy this rocky road treat.
How to Make Rocky Road Ice Cream Recipe
Step 1: Chill Your Loaf Pan
Pop your loaf pan into the freezer to get it nice and cold before you start mixing. This step makes a big difference in how quickly your ice cream sets and helps achieve that smooth texture we all love.
Step 2: Whip the Heavy Cream
Using an electric mixer, beat the chilled heavy cream until stiff peaks form. This means when you lift the beaters, the cream should hold its shape without sinking. This whipped cream base is what makes your Rocky Road Ice Cream Recipe so light and fluffy despite being rich and indulgent.
Step 3: Mix in the Sweet Ingredients and Cocoa
Set aside the tablespoon of almonds, ½ tablespoon of chocolate chips, and 2 tablespoons of mini marshmallows to sprinkle on top later. Then, gently fold the sweetened condensed milk, vanilla extract, cocoa powder, remaining almonds, marshmallows, and chocolate chips into the whipped cream until just combined. Be careful not to overmix to keep that airy texture intact.
Step 4: Pour Into the Chilled Pan
Take your chilled loaf pan out of the freezer and carefully pour in the rocky road mixture. Smooth it out gently with a spatula so it’s even and ready for freezing.
Step 5: Add the Reserved Toppings
Sprinkle the reserved almonds, chocolate chips, and marshmallows evenly over the top of the ice cream mixture. This finishing touch adds extra texture and makes the ice cream look as delightful as it tastes.
Step 6: Freeze Until Set
Place the loaf pan back into the freezer for 6 to 8 hours. This patience pays off when your Rocky Road Ice Cream Recipe comes out perfectly firm yet wonderfully creamy, ready to scoop and savor.
How to Serve Rocky Road Ice Cream Recipe
Garnishes
For an extra-special presentation, top your scoops with a drizzle of chocolate syrup, a sprinkle of cocoa powder, or a few whole almonds. Add a marshmallow or two for that soft gooey contrast every time. It’s the little extras that make a simple scoop feel like a celebration.
Side Dishes
Serve alongside warm brownies or a slice of rich chocolate cake to double down on the chocolate lover’s dream. Fresh berries on the side can also bring a refreshing burst of tartness that balances the rocky road’s sweetness wonderfully.
Creative Ways to Present
Beyond traditional bowls or cones, try layering scoops of this Rocky Road Ice Cream Recipe between chocolate sandwich cookies or serving it in waffle bowls for added crunch. You can even turn it into an ice cream sandwich by pressing rocky road between squares of homemade fudge brownie for a decadent treat.
Make Ahead and Storage
Storing Leftovers
Keep your Rocky Road Ice Cream Recipe in an airtight container in the freezer to prevent ice crystals from forming and to lock in freshness. It’s best enjoyed within 1-2 weeks for the best texture and flavor.
Freezing
Because this recipe doesn’t use an ice cream maker and relies on a no-churn method, it freezes beautifully and evenly in the loaf pan. Just make sure to cover the top tightly with plastic wrap or foil to avoid freezer burn.
Reheating
No reheating necessary here! Ice cream is meant to be enjoyed cold. When you want to serve leftovers, simply let it sit out for about 5 minutes at room temperature to soften slightly for easier scooping.
FAQs
Can I use other nuts besides almonds?
Absolutely! Walnuts or pecans make excellent substitutes and each bring their own unique flavor and texture to the Rocky Road Ice Cream Recipe. Just toast them lightly for extra crunch and aroma.
Is this recipe dairy-free?
This particular Rocky Road Ice Cream Recipe relies on heavy cream and sweetened condensed milk, so it’s not dairy-free. However, you can experiment with coconut cream and sweetened condensed coconut milk for a dairy-free version.
Can I add other mix-ins?
Definitely! Feel free to get creative with your mix-ins—try adding crushed cookies, peanut butter swirls, or even a handful of your favorite candies to personalize your rocky road experience.
Do I need an ice cream maker for this recipe?
Nope, one of the best things about this Rocky Road Ice Cream Recipe is that it’s a no-churn recipe. The whipped cream and condensed milk base gives you creamy, scoopable ice cream without any special equipment.
How long does this ice cream keep in the freezer?
Stored properly in an airtight container, this ice cream will stay delicious for up to two weeks. Beyond that, the texture might begin to degrade, so for the freshest taste, enjoy it sooner rather than later.
Final Thoughts
Making this Rocky Road Ice Cream Recipe at home is not just easy but incredibly rewarding. Each spoonful offers a perfect harmony of creamy, crunchy, and chewy textures packed with chocolatey goodness and nostalgic charm. Whether you’re treating yourself on a warm afternoon or impressing guests at a summer gathering, this recipe is a fantastic go-to that’s sure to become a favorite in your dessert lineup.